
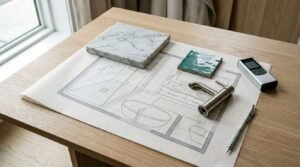
A bathroom floor plan is a scaled technical drawing that shows the exact position of fixtures, walls, doors, and plumbing points within your bathroom space. It is the single most important document in any renovation project, giving contractors, designers, and homeowners a shared reference for every decision made on site. Whether you are planning a full gut renovation or a targeted refresh, understanding how to read and create one puts you in control of the outcome.
Without a clear floor plan, renovation projects run over budget and over schedule. Misread dimensions, poorly positioned fixtures, and overlooked plumbing constraints are among the most common and costly mistakes Sydney homeowners face.
This guide explains what a bathroom floor plan contains, how to interpret one accurately, and how to create your own in four practical steps from measuring your space to reviewing for compliance.
What Is a Bathroom Floor Plan?
A bathroom floor plan is a scaled overhead drawing that maps the physical layout of a bathroom, including walls, doors, windows, fixtures, and plumbing connection points. It is drawn to scale typically 1:50 for residential bathrooms so that every measurement on the corresponds precisely to a real-world dimension.
Floor plans serve two distinct purposes. First, they communicate design intent to builders, plumbers, and tilers so that every trade works from the same reference. Second, they allow homeowners to visualise the finished space before a single tile is laid or pipe is moved.
A bathroom floor plan is not the same as an elevation drawing, which shows vertical surfaces like wall tiles and cabinetry heights. The floor plan is strictly a top-down view of the horizontal plane the footprint of the room and everything within it.
A bathroom floor plan is the foundation of every successful renovation if you are working through the full scope of your project, our bathroom renovation planning guide covers every stage from initial brief to final build.
Key Elements Shown on a Bathroom Floor Plan
Every bathroom floor plan contains a consistent set of elements regardless of the size or complexity of the space. Knowing what each element represents is the first step to reading one accurately.
Fixtures and Their Standard Symbols
Fixtures are represented by standardised symbols that appear consistently across architectural drawings. A toilet is shown as a rectangle with a rounded front. A vanity appears as a rectangle with a circular basin inset. A shower recess is drawn as a square or rectangle with a diagonal line indicating the screen or door swing. A bathtub is shown as a large rectangle with an oval inset.
These symbols follow Australian Standards conventions and are consistent across most residential drawings. If a floor plan includes a legend, always check it some designers use modified symbols for custom fixtures.
Dimensions, Scale, and Clearance Zones
Every floor plan includes dimension lines showing the distance between walls, between fixtures, and from fixtures to walls. These measurements are typically shown in millimetres for residential work in Australia.
Clearance zones are equally important. The National Construction Code (NCC) specifies minimum clearance requirements around fixtures for example, a minimum 600mm clear space in front of a toilet pan and a minimum 750mm between the centreline of a basin and any adjacent wall or obstruction. These zones appear on compliant drawings as dotted boundary lines around each fixture.
Scale is shown in the title block, usually in the bottom right corner of the drawing. A scale of 1:50 means every 1mm on the drawing equals 50mm in the real space.
Plumbing Rough-In Locations
Plumbing rough-in points show where water supply lines and waste outlets penetrate the floor or wall. These are shown as small circles or crosses with annotations indicating the pipe type and connection height. Moving a rough-in point is one of the most expensive changes in any bathroom renovation, which is why understanding their position on the floor plan before finalising your layout is critical.
How to Read a Bathroom Floor Plan
Reading a floor plan accurately requires you to work through three layers of information in sequence: measurements, fixture placement, and structural constraints.
Understanding Scale and Measurements
Start with the scale notation in the title block. Confirm the drawing scale before reading any dimension. If you are working from a printed copy, verify that the print has not been scaled up or down a misscaled print will make every measurement inaccurate.
Read dimension strings from left to right and top to bottom. Check that the overall room dimension matches the sum of the individual dimension segments. Discrepancies between overall and segmented dimensions are a common drafting error that can cause significant problems on site.
Interpreting Fixture Placement and Traffic Flow
Once you understand the dimensions, trace the path a person would take moving through the bathroom. Can the door open fully without hitting the vanity? Is there clear floor space between the shower and the toilet? Can two people use the space simultaneously without obstruction?
Reading a floor plan accurately is one of the most practical skills you can develop before starting any renovation our complete bathroom renovation guide walks through every decision point from layout to final finishes.
Traffic flow analysis is particularly important in smaller Sydney bathrooms where every centimetre counts. A fixture that looks well-positioned in isolation can create a bottleneck when the full movement pattern is considered.
Spotting Structural and Plumbing Constraints
Look for load-bearing wall indicators typically shown as thicker wall lines or with a specific hatch pattern. Moving or removing a load-bearing wall requires structural engineering input and significantly increases renovation cost and complexity.
Identify the location of existing waste outlets and water supply points. If your proposed layout keeps fixtures close to their existing rough-in positions, your renovation will be faster and less expensive. If the layout requires relocating waste lines particularly the toilet waste, which runs at a specific fall gradient expect a meaningful increase in plumbing costs.

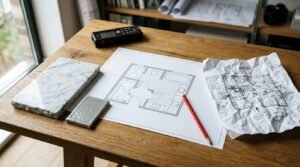
How to Create a Bathroom Floor Plan
Creating your own bathroom floor plan does not require architectural training. It requires accurate measurements, a clear understanding of your layout goals, and a methodical approach to drawing and reviewing the result.
Step 1 Measure Your Existing Bathroom
Measure every wall from corner to corner at floor level. Record the width and height of every door and window opening, including the distance from each opening to the nearest corner. Measure the position of every existing fixture not just its size, but its distance from each adjacent wall.
Use a steel tape measure rather than a fabric tape for accuracy. Measure twice and record in millimetres. Note the position of any visible plumbing penetrations in the floor or walls, and mark the location of the electrical switchboard, exhaust fan, and any ceiling penetrations.
Sketch a rough outline of the room as you measure, recording each dimension directly on the sketch. This becomes your field survey the raw data from which your floor plan is drawn.
Step 2 Choose Your Layout and Fixture Positions
With your measurements recorded, decide where each fixture will sit in the new layout. Consider the position of existing plumbing rough-ins first keeping fixtures close to their current locations reduces cost. Then consider natural light, ventilation, and the traffic flow patterns discussed above.
Standard fixture dimensions for Australian bathrooms are: toilet suite 370–400mm wide by 700–750mm deep; freestanding or wall-hung vanity 600–1200mm wide; shower recess minimum 900 x 900mm; bathtub 1500–1700mm long by 700–750mm wide.
Choosing the right fixture positions depends heavily on your available space and lifestyle priorities our bathroom layout ideas explores the most effective configurations for Sydney homes of every size.
Step 3 Draw or Use a Digital Floor Plan Tool
With your measurements and layout decisions confirmed, you can draw your floor plan by hand on graph paper at a scale of 1:50, or use a digital tool. Free browser-based tools such as Planner 5D, RoomSketcher, and Floorplanner allow you to input room dimensions and drag fixtures into position, automatically generating a scaled floor plan.
When drawing by hand, use a ruler and set square for accuracy. Draw walls first, then door and window openings, then fixtures. Add dimension strings last, checking that every measurement is legible and correctly positioned.
Whether you draw by hand or digitally, include a title block with the room name, drawing scale, date, and your name or the project address.
Step 4 Review for Compliance and Practicality
Before finalising your floor plan, check it against the NCC minimum clearance requirements and Australian Standard AS 1428.1 for accessible design if the bathroom needs to accommodate mobility requirements. Verify that every fixture has the required clearance zone and that the door swing does not obstruct any fixture.
Have your floor plan reviewed by your builder or renovation contractor before committing to a layout. An experienced contractor will identify plumbing, structural, or compliance issues that are not immediately obvious from the drawing alone.
Compliance reviews often surface structural or plumbing changes that affect your budget — our bathroom renovation costs guide breaks down exactly what those changes typically add to a Sydney renovation.
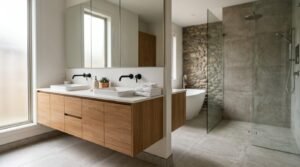
Common Bathroom Layout Types and When to Use Them
The layout type you choose determines how fixtures are distributed across the floor plan and how efficiently the space functions. Five configurations cover the majority of residential bathrooms in Sydney.
A single-wall layout places all fixtures along one wall and suits very narrow bathrooms under 1.5m wide. An L-shaped layout positions fixtures along two adjacent walls, improving traffic flow and allowing a larger shower recess. A galley layout uses two parallel walls and works well in long, narrow spaces where plumbing can be run along a single wet wall.
A three-quarter bathroom layout toilet, vanity, and shower without a bath is the most common configuration in Sydney apartments and secondary bathrooms. A full bathroom adds a bathtub and typically requires a minimum floor area of 4.5 square metres to accommodate all fixtures with compliant clearances.
Understanding which layout type suits your space is a core part of planning your bathroom layout effectively our renovation planning guide helps you match the right configuration to your home’s footprint and your renovation goals.
Mistakes to Avoid When Creating a Bathroom Floor Plan
The most common floor plan mistakes are not drawing errors they are planning errors that become visible only once construction begins.
Ignoring clearance zones is the most frequent problem. A floor plan that positions fixtures without accounting for the required clearance space will fail a building inspection and require costly redesign. Always draw clearance zones before finalising fixture positions.
Forgetting the door swing is a close second. A door that opens into a fixture is a compliance failure and a daily inconvenience. Mark the full arc of every door swing on your floor plan before confirming the layout.
Assuming plumbing can be moved cheaply is a significant budgeting error. Relocating a toilet waste outlet, in particular, involves breaking up the floor slab in a concrete construction a cost that can reach several thousand dollars in a Sydney renovation.
Finally, creating a floor plan without consulting your contractor before finalising it is a missed opportunity. Many floor plan mistakes only become visible once the full bathroom renovation process begins our renovation guide explains how to catch these issues at the planning stage before they become costly on-site problems.
Conclusion
A bathroom floor plan translates your renovation vision into a precise, buildable document that every trade can work from. Reading one accurately and creating one methodically are skills that give homeowners and investors direct control over layout decisions, compliance requirements, and renovation costs.
A well-drawn floor plan reduces on-site surprises, keeps your project on schedule, and gives your contractor the clarity needed to price and deliver the work accurately.
At Sydney Home Renovation, we work with homeowners and investors across Sydney to develop floor plans that are practical, compliant, and built around your specific space contact us to discuss your bathroom renovation and get the planning right from the start.
Frequently Asked Questions
What scale should I use for a bathroom floor plan?
The standard scale for a residential bathroom floor plan in Australia is 1:50. This means every 1mm on the drawing represents 50mm in the real space, giving enough detail to show fixture positions and clearance zones clearly on an A3 or A4 sheet.
Do I need a professional to draw a bathroom floor plan?
You do not need a professional to create a basic floor plan for planning purposes. However, any floor plan submitted for a building approval or used to direct licensed trades should be prepared or reviewed by a qualified draftsperson, designer, or builder to ensure it meets NCC requirements.
What is the minimum size for a bathroom floor plan?
The NCC does not specify a minimum bathroom floor area for residential buildings, but practical minimums apply. A toilet-only room requires approximately 0.9m x 1.2m. A shower, toilet, and vanity configuration requires a minimum of approximately 1.5m x 2.1m to meet clearance requirements around all fixtures.
How do I show plumbing locations on a floor plan?
Plumbing rough-in locations are shown as small circles or crosses on the floor plan, annotated with the pipe type (hot, cold, waste) and connection height above finished floor level. Your plumber can mark existing rough-in positions on your field survey sketch during a site inspection.
Can I use free software to create a bathroom floor plan?
Yes. Free tools including RoomSketcher, Planner 5D, and Floorplanner allow you to input room dimensions and place fixtures to scale. These tools are suitable for planning and communicating your layout to a contractor, though they do not replace a compliant architectural drawing for building approval purposes.
What clearance space is required around bathroom fixtures?
Australian Standard AS 1428.1 and NCC Volume Two specify minimum clearances. A toilet requires 600mm clear space in front of the pan and 450mm from the centreline to any side wall or obstruction. A shower requires a minimum 900 x 900mm internal recess. A basin requires 750mm from its centreline to any adjacent wall or fixed obstruction.


