
A kitchen renovation transforms one of the most important spaces in your home. It combines functional upgrades with aesthetic improvements to create a cooking and gathering area that genuinely suits the way you live.
For Sydney homeowners, first-time renovators, and property investors, understanding the full scope of a kitchen project is essential. It is the difference between a renovation that runs smoothly and one that blows the budget before the benchtops arrive.
We cover everything in this guide: what kitchen renovation involves, Sydney-specific costs, planning essentials, layout options, cabinetry, benchtops, appliances, flooring, lighting, financing, electrical and plumbing requirements, contractor selection, project timelines, common mistakes, and value considerations.
What Is a Kitchen Renovation?
A kitchen renovation is a planned upgrade to your kitchen space. It ranges from cosmetic refreshes to complete structural transformations, and the scope of work typically includes replacing or refacing cabinetry, installing new benchtops and splashbacks, upgrading appliances, improving lighting, and potentially modifying the room’s layout to enhance functionality and flow.
Full Kitchen Renovation vs Partial Update
A full kitchen renovation involves gutting the existing space and rebuilding with new cabinetry, benchtops, appliances, flooring, and often modified plumbing and electrical configurations. This approach suits kitchens that are outdated, poorly laid out, or no longer meet the household’s needs.
Partial updates focus on specific elements, replacing benchtops, updating cabinet doors, or installing new appliances while keeping the existing layout and infrastructure intact. They cost less and cause less disruption, but they do not fix underlying layout or storage problems.
When to Renovate Your Kitchen
Kitchens older than 15–20 years often have outdated layouts, worn surfaces, and inefficient appliances that no longer serve modern cooking habits. Functional issues such as insufficient storage, poor workflow, or inadequate bench space are clear signals that a redesign is overdue.
Property investors preparing homes for sale or rent benefit from kitchen upgrades that increase appeal and value. Whether you are planning a complete transformation or a targeted cosmetic refresh, understanding the scope of your project accurately sets realistic expectations for timeline and budget.
Kitchen Renovation Costs in Sydney
Kitchen renovation costs in Sydney vary significantly based on the scope of work, quality of materials, and complexity of the project. Understanding these cost factors helps you set a realistic budget and make informed decisions about where to allocate your renovation dollars.
Average Kitchen Renovation Costs by Scope
Renovation Level | Typical Cost Range | What’s Included |
Budget | $15,000 – $25,000 | Flat-pack cabinetry, laminate benchtops, basic appliances, minimal layout changes |
Mid-Range | $25,000 – $45,000 | Custom cabinetry, stone benchtops, quality appliances, some layout modifications |
Premium | $45,000 – $80,000+ | High-end custom cabinetry, premium stone or solid surface benchtops, top-tier appliances, structural changes |
These ranges reflect Sydney market pricing as of 2026 and include both materials and labour. Actual costs depend on kitchen size, material selections, and the extent of structural or work required.
Labour Costs for Kitchen Renovations
Labour typically accounts for 35–45% of total kitchen renovation costs in Sydney. This includes cabinet installation, benchtop templating and fitting, plumbing, electrical work, tiling, and painting.
Licensed tradespeople command higher rates, but they ensure compliance with Australian standards and provide warranty coverage on their work. Cutting corners on labour is one of the fastest ways to create expensive problems down the track.
Material and Fitting Allowances
Material costs vary dramatically based on your selections. Cabinetry represents the largest material expense, ranging from $8,000 for basic flat-pack options to $30,000+ for fully custom designs.
Benchtops range from $2,000 for laminate to $8,000+ for premium engineered stone. Appliance packages span from $3,000 for basic models to $15,000+ for integrated premium brands.

Planning Your Kitchen Renovation
Effective planning prevents costly mid-project changes and keeps your renovation on track. A structured approach addresses budget, design, and compliance requirements before any demolition begins.
Setting a Realistic Budget
Start by determining your total available budget, then allocate funds across major categories: cabinetry (30–40%), benchtops (10–15%), appliances (15–20%), labour (35–45%), and a contingency of 10–15% for unexpected issues.
Research current Sydney pricing for your preferred materials and finishes before you commit to anything. Expectations that do not align with market reality are the single most common cause of budget stress mid-project.
Design Considerations and Layout Options
Kitchen design balances aesthetics with functionality. Consider how you use your kitchen daily, cooking habits, storage needs, and how the space connects to adjacent living areas.
Working with a designer or experienced contractor early helps you explore layout options that maximise efficiency within your existing footprint, or identify genuine opportunities for expansion.
Permits and Approvals in NSW
Most kitchen renovations in NSW do not require development approval if they do not involve structural changes or increase the building’s footprint. However, any work involving plumbing, gas, or electrical modifications must be completed by licensed tradespeople who provide compliance certificates.
If your property is in a strata scheme, you will need to check your owners corporation by-laws before starting work. Many strata schemes require written approval for any renovation that affects common property, waterproofing, or shared areas, and the approval process can add four to eight weeks to your planning timeline. Heritage-listed properties carry additional requirements; check with your local council early.
Kitchen Layout Options
The layout you choose affects how efficiently you work in your kitchen and how the space flows with the rest of your home. Each configuration suits different room shapes, household sizes, and cooking styles.
Popular Kitchen Layouts Explained
Galley kitchens feature two parallel runs of cabinetry and work well in narrow spaces, creating an efficient corridor for cooking. L-shaped layouts position cabinetry along two adjacent walls, offering flexibility and an open feel that suits medium-sized kitchens.
U-shaped configurations wrap cabinetry around three walls, maximising storage and bench space in larger rooms. Island kitchens add a freestanding workstation that provides additional prep space, storage, and often serves as a casual dining area.
Choosing the Right Layout for Your Space
The work triangle concept guides layout decisions by positioning the sink, cooktop, and refrigerator at optimal distances from each other. Effective layouts minimise steps between these key zones while maintaining clear traffic flow through the space.
Consider how many people typically cook simultaneously and whether the kitchen serves as a social hub or primarily a functional workspace. The right layout for a family of five cooking together every night looks very different from the right layout for a single professional who entertains occasionally.
FURTHER READING
► How to Choose the Best Kitchen Renovation Contractor in Sydney
Kitchen Cabinetry and Storage Solutions
Cabinetry defines both the look and functionality of your kitchen. The materials you choose and how you configure storage directly impact daily usability and long-term satisfaction with your renovation.
Cabinet Types and Materials
Laminate cabinets offer durability and affordability with a wide range of colours and finishes. Timber veneer provides natural warmth and can be refinished over time. Polyurethane (2-pack) delivers a seamless, painted finish that suits contemporary designs, and solid timber offers premium aesthetics and longevity at a higher price point.
Cabinet construction quality matters as much as the visible finish. Look for solid carcasses, quality hinges with soft-close mechanisms, and drawer systems rated for heavy daily use.
Flat-Pack vs. Custom Cabinetry
Flat-pack cabinetry from suppliers like IKEA or Kaboodle costs significantly less typically $8,000–$15,000 for a full kitchen- and suits standard room dimensions well. Lead times are short, often one to two weeks, and the range of finishes has improved considerably in recent years.
Custom cabinetry is designed and built to your exact specifications. It handles non-standard dimensions, unusual layouts, and premium finish requirements that flat-pack cannot accommodate. Expect to pay $20,000–$35,000+ and allow eight to twelve weeks for manufacture and delivery. For most Sydney homeowners, the decision comes down to whether the room’s dimensions and design ambitions genuinely require custom work.
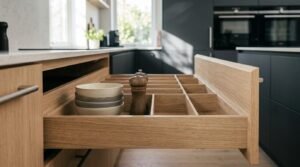
Maximising Storage in Your Kitchen
Effective storage design eliminates wasted space and keeps frequently used items accessible. Deep drawers work better than base cabinets for pots and pans. Pull-out pantry systems maximise narrow spaces, and corner solutions such as carousel units or magic corners access otherwise dead zones.
Overhead cabinets extending to the ceiling provide additional storage while creating a streamlined appearance. Every centimetre of vertical space in a Sydney kitchen is worth using.

Benchtops and Splashbacks
Benchtops and splashbacks work together to define your kitchen’s visual character while serving essential functional roles. Material selection balances aesthetics, durability, maintenance requirements, and budget.
Benchtop Materials Compared
Engineered stone brands like Caesarstone and Silestone dominate the Australian market, offering consistent colour, durability, and relatively low maintenance. One important regulatory note: NSW introduced strict controls on dry cutting of engineered stone in 2024 due to silica dust health risks. Any contractor working with engineered stone must use wet-cutting methods and appropriate respiratory protection. Ask your contractor directly how they handle this; it is a compliance requirement, not a preference.
Natural granite provides unique patterns and excellent heat resistance but requires periodic sealing. Laminate remains the most affordable option, with improved designs that convincingly mimic stone and timber. Solid surface materials allow seamless joins and integrated sinks, and timber adds warmth but requires regular oiling and careful use around water.
FURTHER READING
Splashback Options and Trends
Tiled splashbacks offer endless design possibilities, from classic subway tiles to large-format porcelain. Glass splashbacks create a seamless, easy-clean surface available in virtually any colour. Stone splashbacks matching your benchtop create visual continuity, while pressed metal and mirror options suit specific design styles.
Grout lines in tiled splashbacks require periodic cleaning and resealing. Glass and stone surfaces wipe clean easily a practical consideration worth weighing against the aesthetic appeal of grout-heavy tile patterns.
Kitchen Appliances and Fixtures
Appliance and fixture selections affect both your daily cooking experience and your renovation budget. Prioritising features that match your actual cooking habits delivers better value than chasing specifications you will never use.
Essential Appliances for Modern Kitchens
Ovens range from basic electric models to pyrolytic self-cleaning units and combination steam ovens. Rangehoods remove cooking odours and moisture, with ducted systems outperforming recirculating models in performance. Dishwashers have become standard, with integrated models concealed behind cabinet panels for a streamlined look.
Energy efficiency ratings matter when selecting appliances. Higher-rated models cost more upfront but reduce running costs meaningfully over their lifespan, a relevant consideration given Sydney’s electricity prices.
Induction vs. Gas Cooktops
Induction cooktops heat faster, use less energy, and are easier to clean than gas alternatives. They require induction-compatible cookware, and the upfront cost is typically $1,200–$3,500 for a quality unit versus $800–$2,500 for gas.
Gas cooktops remain popular with serious home cooks for their precise flame control and compatibility with all cookware types. Installation requires a licensed gas fitter and a gas connection, which adds cost if your kitchen does not already have one. With NSW’s increasing focus on electrification in new builds, induction is worth serious consideration for any renovation planned to last 15+ years.
FURTHER READING
Plumbing Fixtures and Tapware
Kitchen sinks come in undermount, top-mount, and integrated configurations in stainless steel, stone composite, or ceramic materials. Tapware options include traditional mixer taps, pull-out spray models, and filtered water systems.
Quality fixtures from established brands offer better longevity and easier access to replacement parts. A cheap tap that fails inside a warranty period is a minor inconvenience; one that fails after five years is a plumbing call-out.
Kitchen Flooring Options
Kithchen Flooring is one of the most overlooked decisions in a kitchen renovation, yet it takes more daily punishment than almost any other surface. The right choice balances durability, water resistance, comfort underfoot, and visual cohesion with the rest of the space.
Flooring Materials for Sydney Kitchens
Porcelain and ceramic tiles are the most popular choice in Sydney kitchens. They are water-resistant, durable, and available in formats from small mosaic to large 600×600mm slabs. Large-format tiles reduce grout lines and are easier to clean, though they require a perfectly level subfloor.
Timber flooring adds warmth and suits open-plan spaces where the kitchen flows into a living area. Engineered timber handles humidity better than solid timber and is a practical choice for kitchens, though it still requires care around water. Luxury vinyl plank (LVP) has become a strong mid-range option, fully waterproof, comfortable underfoot, and available in convincing timber and stone looks at a fraction of the cost. Polished concrete suits contemporary and industrial designs and is extremely durable, but it is cold underfoot and requires sealing to resist staining.
Flooring and Your Renovation Budget
Budget $60–$120 per square metre for quality porcelain tiles including installation. Engineered timber runs $100–$180 per square metre installed. Luxury vinyl plank sits at $50–$90 per square metre installed and is often the best value-for-money option for investment properties.
Flooring is typically installed after cabinetry and before appliances. Coordinate your flooring selection with your cabinet and benchtop choices early; mismatched undertones are a common and expensive mistake to fix after installation.
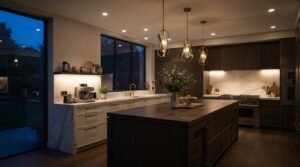
Kitchen Lighting Design
Lighting is one of the highest-impact, lowest-cost upgrades in a kitchen renovation. A well-lit kitchen is safer, more functional, and more visually appealing, yet lighting is frequently treated as an afterthought.
The Three Layers of Kitchen Lighting
Task lighting illuminates the specific areas where you work: the benchtop, the cooktop, and the sink. Under-cabinet LED strip lights are the most effective task lighting solution and cost relatively little to install during a renovation. Recessed downlights positioned directly above work zones serve the same purpose in kitchens without overhead cabinets.
Ambient lighting provides the general illumination for the whole room. A grid of LED downlights on a dimmer circuit gives you flexibility to shift from bright working light to a softer atmosphere for dining. Feature lighting, such as a pendant over an island or a statement fixture above a dining table, adds visual interest and defines zones in open-plan spaces.
Electrical Planning for Kitchen Lighting
All lighting circuits must be planned before walls are closed. Adding a lighting circuit after plastering is expensive and disruptive. Work with your electrician during the rough-in stage to position every downlight, under-cabinet fitting, and pendant point before any plasterboard goes up.
LED downlights use 5–10 watts each versus 50 watts for older halogen fittings, a meaningful running cost difference across a full kitchen grid. Specify LED-compatible dimmers to avoid flickering, which is a common issue when older dimmer switches are paired with LED globes.
How to Finance Your Kitchen Renovation
A kitchen renovation is a significant financial commitment, and understanding your financing options before you start helps you plan with confidence rather than scrambling for funds mid-project.
Common Financing Options
A home equity loan or redraw facility is the most cost-effective way to finance a renovation for homeowners with equity in their property. Interest rates are typically lower than personal loans, and the repayment period is flexible. Speak to your lender before you start getting quotes; knowing your available budget changes the conversation with contractors.
Renovation loans are personal loans specifically structured for home improvement projects. They are unsecured, which means no equity is required, but interest rates are typically 8–15% per annum in the current market. They suit smaller projects or homeowners without sufficient equity.
Staged Payments and Cash Flow
Most Sydney kitchen renovation contractors structure payments in milestones: a deposit on signing (10–20%), progress payments tied to completed stages, and a final payment on practical completion. Never pay more than 10% as a deposit for work that has not yet started; this is a consumer protection principle reinforced by NSW Fair Trading guidelines.
Building your contingency (10–15% of total budget) into your financing from the start means unexpected costs do not derail the project. A hidden plumbing issue or asbestos discovery during demolition is not unusual in Sydney homes built before 1990, and having the funds available to address it without stopping work keeps the project on schedule.

Electrical and Plumbing Considerations
Kitchen renovations typically require significant electrical and plumbing work to support modern appliances and comply with current Australian standards. Understanding these requirements helps you budget accurately and avoid compliance issues.
Electrical Requirements for Kitchen Renovations
Modern kitchens need more powerpoints than older designs. Dedicated circuits are required for high-draw appliances: ovens need a 20-amp circuit, cooktops need a 32-amp or 40-amp circuit depending on the model, and dishwashers need their own 10-amp circuit. Running these from a shared circuit is a compliance failure and a fire risk.
Lighting design has evolved to include task lighting under overhead cabinets, ambient downlights on dimmer circuits, and feature pendants. All electrical work must be completed by a licensed electrician who provides a Certificate of Compliance; this is a legal requirement in NSW, not optional.
Plumbing Upgrades and Relocations
Moving a sink or dishwasher requires extending water supply and waste lines, which adds cost and complexity. Budget an additional $1,500–$3,500 for a straightforward sink relocation, more if the waste line needs to be rerouted through a slab.
Gas cooktop installations need a licensed gas fitter who provides a gas compliance certificate. If your renovation involves relocating plumbing more than a short distance, factor in additional time; plumbing relocations are one of the most common causes of timeline extensions in kitchen projects.
Hiring a Kitchen Renovation Contractor
The contractor you choose significantly impacts your renovation experience and outcome. Taking time to vet potential contractors thoroughly protects your investment and reduces stress during the project.
What to Look for in a Renovation Contractor
Verify that your contractor holds appropriate licensing for the work involved. In NSW, building work over $5,000 requires a licensed contractor; check their licence number on the NSW Fair Trading register before signing anything. Confirm their insurance coverage includes public liability and workers’ compensation.
Request references from recent kitchen projects and follow up with those clients directly. Ask specifically about communication during the project, how the contractor handled unexpected issues, and whether the final cost matched the quote. These three questions reveal more than any portfolio photo.
Look for contractors who provide detailed written quotes breaking down labour and materials separately. Vague or verbal quotes make it impossible to compare options or hold contractors accountable when disputes arise.
Contractor Red Flags to Watch For
A contractor who pressures you to sign quickly, asks for a large upfront deposit, or cannot provide a licence number is a serious risk. Avoid any contractor who provides a quote without visiting the site; accurate kitchen quotes require measuring the space and assessing the existing.
Be cautious of quotes that are significantly lower than others. In Sydney’s trades market, a quote that is 20–30% below the field usually means something is excluded, the contractor is underqualified, or the materials specified are below the standard you discussed.
Questions to Ask Before Signing a Contract
Ask about the contractor’s approach to project management, including how they coordinate trades and handle unexpected issues. Clarify payment terms: progress payments tied to completed milestones, not calendar dates. Understand the warranty coverage on both workmanship and materials, and confirm the expected timeline and what factors might cause delays.
Kitchen Renovation Timeline and Project Stages
Understanding the typical timeline helps you plan around the disruption and set realistic expectations for when you will have your kitchen back. Several factors influence how long your specific project takes.
Typical Renovation Timeline
A standard kitchen renovation in Sydney takes 4–8 weeks from demolition to completion. This timeline assumes materials are ordered in advance, and no significant structural changes are involved. More complex projects involving layout modifications, structural work, or custom cabinetry extend to 10–12 weeks or longer.
Stage | Typical Duration |
Design and planning | 2–4 weeks |
Material ordering | 4–8 weeks (cabinetry lead time) |
Demolition | 1–2 days |
Rough-in (electrical, plumbing) | 3–5 days |
Plastering and painting | 3–5 days |
Cabinet installation | 3–5 days |
Benchtop templating and installation | 1–2 weeks |
Appliance installation and finishing | 2–3 days |
Managing Delays and Unexpected Issues
Common delay causes include material supply issues, discovery of hidden problems during demolition, water damage, outdated wiring, and asbestos, which are all found in Sydney homes built before 1990, and coordination challenges between trades.
Building a contingency into both your budget and your timeline absorbs these issues without derailing the project. We always recommend clients plan for their kitchen to be out of action for at least two weeks longer than the quoted timeline. Projects that finish on schedule feel like a bonus; projects that run over feel like a crisis.

Common Kitchen Renovation Mistakes to Avoid
Most kitchen renovation problems stem from inadequate planning, unrealistic budgeting, or poor design decisions. Learning from the mistakes we see repeatedly saves you time, money, and significant frustration.
Budget Blowouts and How to Prevent Them
Budget overruns typically result from inadequate contingency allowances, scope creep during the project, and underestimating the cost of finishes and fixtures. Prevent blowouts by getting detailed written quotes before committing, finalising all selections before construction begins, and maintaining a 10–15% contingency.
Avoid the temptation to upgrade materials mid-project. Each change requires requoting and often delays the timeline. Make all major decisions during the planning phase when changes cost nothing.
Design and Functionality Errors
Common design mistakes include insufficient bench space, poor lighting placement, inadequate storage, and layouts that ignore work triangle principles. Prioritising aesthetics over functionality leads to kitchens that look good in photos but frustrate daily use.
Test your proposed layout by walking through typical cooking tasks mentally before anything is built. Consider where you will place hot pans, how you will access frequently used items, and whether the traffic flow works when multiple people are in the space simultaneously.
Over-Capitalising for Your Suburb
Over-capitalising is a risk that property investors and homeowners planning to sell often underestimate. Research comparable sales in your suburb to understand what buyers expect and what premium a renovated kitchen actually commands in your specific market.
A $70,000 premium kitchen renovation in a suburb where comparable homes sell for $900,000 is unlikely to return its full cost. A $30,000 mid-range renovation in the same suburb almost certainly will. Match your renovation spend to your suburb’s ceiling, not your personal taste.
Adding Value Through Kitchen Renovation
A well-executed kitchen renovation increases your property’s value and appeal. Understanding which improvements deliver the best return helps you prioritise your budget effectively.
ROI on Kitchen Renovations
Kitchen renovations typically return 50–80% of their cost in added property value, making them one of the higher-returning home improvements available to Sydney homeowners. The exact return depends on the quality of work, how the renovation compares to other homes in your area, and current market conditions.
In Sydney’s inner suburbs and established middle-ring areas, a well-executed mid-range kitchen renovation consistently adds more to sale price than its cost, particularly in a market where buyers are comparing multiple properties and kitchen condition is a primary decision factor. In outer suburbs or areas with lower price ceilings, the return is more variable and requires careful research before committing to a premium spend.
Features That Increase Property Value
Buyers consistently value quality cabinetry, stone benchtops, and modern appliances. Good lighting, adequate storage, and functional layouts matter more than trendy finishes that date quickly. Neutral colour schemes appeal to broader buyer pools than bold design choices.
For investment properties, focus on durable, low-maintenance materials that withstand tenant use while presenting well for inspections and future sales. Engineered stone benchtops, porcelain tile flooring, and polyurethane cabinetry are the combination we recommend most often for investment kitchens; they photograph well, clean easily, and hold up to heavy use.
Conclusion
A successful kitchen renovation combines careful planning, realistic budgeting, quality materials, and skilled execution. When those elements come together, the result is a space that enhances daily living and adds lasting value to your home.
The sections in this guide give you the framework to approach every decision, from layout and materials to contractor selection and financing, with the information you need to make confident choices.
At Sydney Home Renovation, we bring transparent pricing, expert trade coordination, and genuine construction experience to every kitchen project we take on. We would love to help you plan yours; get in touch for an obligation-free consultation and a detailed quote tailored to your home.
Frequently Asked Questions
How much does a kitchen renovation cost in Sydney?
Kitchen renovations in Sydney range from $15,000 for budget updates to $80,000+ for premium transformations. Final cost depends on kitchen size, material quality, and the extent of structural or work required.
How long does a kitchen renovation take?
A standard kitchen renovation takes 4–8 weeks from demolition to completion. Complex projects involving layout changes or custom cabinetry extend to 10–12 weeks. Cabinetry lead times often determine the overall schedule.
Do I need council approval for a kitchen renovation?
Most kitchen renovations in NSW do not require council approval if they involve no structural changes. All electrical, plumbing, and gas work must be completed by licensed tradespeople who provide compliance certificates.
What is the best kitchen layout?
The best layout depends on your room dimensions and how you use the space. L-shaped and U-shaped layouts suit most homes. Galley kitchens work well in narrow spaces, and island configurations need larger rooms but add significant workspace.
What kitchen benchtop material is most durable?
Engineered stone offers the best combination of durability, low maintenance, and aesthetic appeal for most households. Natural granite provides excellent heat resistance, and laminate offers affordability with improved durability in modern formulations.
Should I renovate my kitchen before selling?
A kitchen renovation increases sale price and reduces time on market in most Sydney suburbs. Focus on quality basics rather than premium upgrades, and research comparable sales to avoid over-capitalising for your area.
How do I choose a kitchen renovation contractor?
Verify licensing on the NSW Fair Trading register, check references from recent projects, and compare detailed written quotes. Look for clear communication, realistic timelines, and transparent pricing.
What flooring is best for a kitchen renovation?
Porcelain tiles are the most durable and water-resistant option. Luxury vinyl plank is the best value mid-range choice. Engineered timber suits open-plan spaces where the kitchen flows into a living area.
How do I finance a kitchen renovation?
A home equity loan or redraw facility offers the lowest interest rates for homeowners with equity. Renovation loans are available without equity but carry higher rates. Structure payments in milestones and always maintain a 10–15% contingency.
Is engineered stone safe to use in a Sydney kitchen?
Yes, when installed correctly. NSW introduced strict controls on dry cutting of engineered stone in 2024 due to silica dust risks. Confirm your contractor uses wet-cutting methods and holds current compliance knowledge before work begins.
")

