
A bathroom renovation in Sydney moves through seven distinct stages, and the order they happen in is not flexible. Each stage depends on the one before it, and skipping ahead or overlapping trades is one of the most common reasons renovations run over budget and over time. Understanding what happens at each stage, why it happens in that sequence, and what decisions you need to make before work begins gives you the control to manage your project with confidence.
Knowing the stages also protects your budget. Hidden costs and unexpected delays almost always trace back to decisions made too late or trades called in the wrong order.
This guide walks through all seven stages of a bathroom renovation, explains what each one involves, and flags the decisions that matter most at every step.
What Are the Main Stages of a Bathroom Renovation?
A bathroom renovation follows a fixed sequence driven by building codes, trade dependencies, and waterproofing requirements. The seven stages are: planning and design, demolition and strip-out, waterproofing and structural work, plumbing and electrical rough-in, tiling and wall finishes, fixture and fitting installation, and final fit-out with inspection and handover.
Each stage has a defined scope, a set of trades involved, and a point at which the next stage can begin. Understanding this sequence before you start is the single most effective way to avoid cost blowouts and delays.
Why the Order of Stages Matters
Trades cannot work simultaneously in a small space, and certain materials cannot be installed until others have cured or been inspected. Waterproofing, for example, must be applied before tiling begins and must pass inspection before it is covered. Plumbing rough-in must be completed before walls are closed. Fixtures cannot be installed until tiling is finished and adhesive has set. The sequence is not a preference; it is a structural and legal requirement in New South Wales.

Stage 1 Planning and Design
Planning is the stage that determines the success of every stage that follows. This is where you lock in your layout, select your materials, confirm your budget, and brief your contractor. Decisions made here or not made here will affect every trade, every timeline, and every dollar spent downstream.
At this stage, you should finalise your floor plan, confirm whether any walls or plumbing points will move, select your tiles, fixtures, and fittings, and establish a realistic budget with a contingency allowance of 10 to 15 percent for unexpected structural findings.
What to Lock In Before Work Begins
Before demolition starts, you need confirmed selections for tiles, tapware, vanity, toilet suite, shower screen, and any heated towel rails or exhaust fans. Late selections are one of the most common causes of trade delays. If your tiles are not on site when the tiler arrives, the project stops, and call-out fees accumulate.
You also need a signed contract with your contractor that specifies scope, inclusions, exclusions, payment schedule, and a realistic timeline. Our bathroom renovation guide covers the full scope of what to expect across costs, timelines, and contractor selection before you commit to a single design choice.
Stage 2 Demolition and Strip-Out
Demolition is the first physical stage of the renovation. The existing bathroom is stripped back to its structural shell; tiles are removed, the vanity and toilet are disconnected and taken out, the shower screen comes down, and all wall linings are stripped to expose the framing and substrate beneath.
This stage typically takes one to two days for a standard Sydney bathroom. The cost varies depending on the size of the space, the number of layers of existing tiling, and whether asbestos testing is required. Homes built before 1990 in New South Wales may contain asbestos in wall sheeting or floor adhesives, and licensed removal is a legal requirement if it is found.
What Gets Removed and Why It Affects Cost
The strip-out reveals the true condition of your bathroom’s structure. Rotted framing, failed waterproofing membranes, corroded pipes, and subfloor damage are all commonly discovered at this stage. These findings are not failures of the renovation process; they are the reason the renovation is necessary. A contractor who identifies these issues early and prices them transparently is protecting your budget, not adding to it.
If you need a dedicated breakdown of what demolition costs in Sydney, our bathroom demolition cost guide explains what to expect at strip-out stage.
Stage 3 Waterproofing and Structural Work
Waterproofing is the most legally critical stage of a bathroom renovation in New South Wales. Under the National Construction Code and AS 3740, all wet areas must be waterproofed by a licensed waterproofer, and the membrane must be inspected and approved by a certifier before it is covered by tiles.
This stage also includes any structural repairs identified during demolition, replacing rotted framing, repairing subfloor damage, installing new wall sheeting, and ensuring the substrate is level, sound, and ready to receive the waterproofing membrane.
Why Waterproofing Cannot Be Skipped
A failed waterproofing membrane is the most expensive defect a bathroom can develop. Water that penetrates behind tiles and into the wall cavity causes structural timber rot, mould growth, and damage to adjacent rooms, all of which are far more expensive to remediate than the original renovation cost. In New South Wales, waterproofing that has not been inspected and certified is also a legal liability that affects your ability to sell the property.
Understanding how waterproofing fits into your total renovation spend is essential. The bathroom renovation costs breakdown in our complete guide explains exactly what this stage contributes to your overall budget. For a detailed look at what waterproofing compliance requires in Sydney, our waterproofing requirements guide covers what homeowners need to know before work begins. Stage 4 Plumbing and Electrical Rough-In
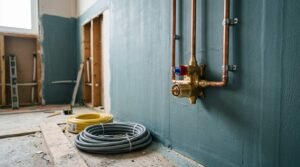
Once waterproofing is approved, licensed plumbers and electricians complete their rough-in work. This means running new pipework to the confirmed fixture locations, installing drainage, positioning electrical conduit for lighting, exhaust fans, and heated towel rails, and making any connections to the main water supply or electrical board that the design requires.
Rough-in work happens inside the walls and floor before they are closed. This is the last opportunity to move plumbing points or add electrical circuits without major rework costs. Any changes to fixture locations after this stage will require opening finished walls.
What Trades Are Involved at This Stage
A licensed plumber handles all water supply and drainage work. A licensed electrician handles all wiring, circuit protection, and compliance with AS 3000 wiring rules. In New South Wales, both trades must be licensed, and their work must be inspected before walls are closed. Your contractor coordinates the sequencing of both trades to avoid delays.
When plumbing or electrical work extends beyond the bathroom into adjacent rooms or the main stack, the scope can expand significantly; our whole home renovation planning guide explains how to coordinate trades across multiple rooms without blowing your timeline or budget.
If you want to understand what the rough-in stage involves in detail, our plumbing rough-in guide explains what happens and what it costs.

Stage 5 Tiling and Wall Finishes
Tiling is the most visible stage of the renovation and one of the most time-sensitive. Tiles must be on site before the tiler arrives. The substrate must be fully cured and level. The waterproofing membrane must be approved. When all three conditions are met, tiling can begin, and the bathroom starts to take its final shape.
Wall tiles are typically installed before floor tiles. Grout is applied after adhesive has cured, which usually takes 24 hours. The full tiling stage for a standard Sydney bathroom takes two to four days depending on tile format, layout complexity, and the number of cuts required.
How Tile Selection Affects Budget and Timeline
Large-format tiles require more precise substrate preparation and generate more waste from cuts, both of which add cost. Mosaic tiles and feature walls increase labour time significantly. Imported tiles with long lead times can delay the entire project if they are not ordered early enough in the planning stage.
The most budget-efficient approach is to select tiles that are in stock locally, sized appropriately for the space, and consistent with the substrate preparation your contractor has already completed. Our bathroom tiling cost guide explains how labour, materials, and tile selection interact to determine your final tiling spend.
Stage 6 Fixture and Fitting Installation
With tiling complete and grout cured, fixtures and fittings are installed. This includes the vanity, basin, tapware, toilet suite, shower screen or bath, heated towel rail, exhaust fan, mirrors, and any accessories. Plumbers and electricians return for their final fix, connecting fixtures to the rough-in points completed in Stage 4.
The sequence within this stage matters. Shower screens are installed after tiling and before silicone is applied. Vanities are positioned before basins are connected. Toilet suites are installed after floor tiling is complete. Getting this sequence wrong creates rework that adds both cost and time.
Sequencing Fixtures to Avoid Costly Rework
The most common mistake at this stage is installing fixtures before adjacent finishes are complete. A vanity installed before wall tiling is finished, for example, may need to be removed to allow the tiler access, adding a call-out fee and a delay. Your contractor should provide a clear fixture installation sequence as part of the project schedule.
Fixture sequencing follows the same logic across wet areas of the home if you are also planning a kitchen update, our kitchen renovation fixtures guide walks through how to coordinate fitting installation across both projects to reduce trade call-out costs.

Stage 7 Final Fit-Out, Inspection, and Handover
The final stage covers all remaining work: silicone joints around the shower screen, bath, and vanity; installation of mirrors, toilet roll holders, and towel rails; final electrical connections for lighting and exhaust fans; and a thorough clean of the completed space.
A final inspection is then conducted either by your contractor, a private certifier, or both to confirm that all work complies with the National Construction Code, AS 3740 waterproofing standards, and any council conditions that applied to the project. Once the inspection is passed, the bathroom is handed over.
What a Final Inspection Covers
The final inspection checks waterproofing compliance documentation, plumbing and drainage function, electrical safety, tile adhesion and grout integrity, fixture operation, and silicone joint quality. Any defects identified at this stage are rectified before handover. A reputable contractor will conduct their own pre-inspection walkthrough before calling the certifier.
If your laundry shares a wall or plumbing stack with your bathroom, the final inspection stage is the ideal point to assess both spaces together. Our laundry renovation stages guide explains how to sequence both projects efficiently.
For homeowners who want to go beyond the stages and understand the complete picture, from budgeting and contractor briefing to material selection and project management, our full bathroom renovation guide covers every decision point in one place.
How Long Does Each Stage Take?
A standard bathroom renovation in Sydney takes three to four weeks from demolition to handover, assuming all materials are on site and no significant structural issues are found during strip-out.
| Stage | Typical Duration |
| Planning and Design | 1–4 weeks (before demolition) |
| Demolition and Strip-Out | 1–2 days |
| Waterproofing and Structural Work | 2–4 days (plus cure time and inspection) |
| Plumbing and Electrical Rough-In | 1–2 days |
| Tiling and Wall Finishes | 2–4 days |
| Fixture and Fitting Installation | 1–2 days |
| Final Fit-Out, Inspection, and Handover | 1–2 days |
The most common cause of timeline blowouts is late material selection, structural findings during demolition, and inspection delays. All three are manageable with thorough planning and a contractor who builds realistic contingency into the schedule. Our bathroom renovation timeline guide covers how long each stage takes in Sydney and what causes delays at each point.
Common Mistakes at Each Renovation Stage
Understanding where renovations go wrong is as useful as understanding the stages themselves. The most frequent mistakes are:
Planning: Finalising the design without confirming material lead times, or setting a budget without a contingency allowance.
Demolition: Not testing for asbestos in pre-1990 homes before strip-out begins.
Waterproofing: Allowing tiling to begin before the waterproofing membrane has been inspected and approved.
Plumbing and Electrical: Changing fixture locations after rough-in is complete, which requires opening finished walls.
Tiling: Ordering tiles without confirming they are in stock, causing project delays when the tiler arrives to an empty site.
Fixture Installation: Installing fixtures before adjacent finishes are complete, creating rework costs.
Final Inspection: Skipping the contractor’s pre-inspection walkthrough, which results in defects being identified by the certifier rather than resolved beforehand.
Mistakes made during a bathroom renovation are compounded when the project is part of a larger structural change; if your renovation connects to a home extension, our home extension planning guide explains how to sequence both projects to avoid costly rework.
For a deeper look at what goes wrong and how to prevent it, our bathroom renovation mistakes guide covers every stage in detail.
Conclusion
A bathroom renovation in Sydney follows a fixed sequence of seven stages, each one building on the last. Understanding that sequence and the decisions required at each point is what separates a renovation that runs smoothly from one that runs over budget and over time.
The stages most homeowners underestimate are waterproofing and planning. Both are invisible in the finished bathroom, and both have the greatest impact on long-term value and structural integrity.
At Sydney Home Renovation, we manage every stage of your bathroom renovation from initial planning through to final handover with transparent pricing, licensed trades, and clear communication at every step. Contact us to start planning your renovation with confidence.
Frequently Asked Questions
What is the first stage of a bathroom renovation?
The first stage is planning and design. Before any physical work begins, you need a confirmed layout, finalised material selections, a realistic budget with contingency, and a signed contract with your contractor. Decisions made at this stage determine the cost and timeline of every stage that follows.
How long does a bathroom renovation take in Sydney?
A standard bathroom renovation in Sydney takes three to four weeks from demolition to handover. This assumes all materials are on site before work begins and no significant structural issues are found during strip-out. Delays most commonly result from late tile selections, asbestos removal, or inspection scheduling.
Can I live at home during a bathroom renovation?
Yes, in most cases. If you have a second bathroom, the disruption is manageable. If the renovated bathroom is your only one, your contractor can discuss sequencing options to minimise the period without a functional bathroom, though some disruption is unavoidable during the demolition and waterproofing stages.
What stage is the most expensive in a bathroom renovation?
Plumbing and waterproofing are typically the highest-cost stages because they involve licensed trades, compliance inspections, and work that cannot be cut short without legal and structural consequences. Tiling is the next most significant cost, particularly when large-format or imported tiles are selected.
Do I need council approval for a bathroom renovation in Sydney?
Most like-for-like bathroom renovations in Sydney do not require council approval and can proceed under a complying development certificate or as exempt development. However, if you are moving plumbing points, altering the floor plan, or the work forms part of a larger structural project, approval may be required. Your contractor or a private certifier can confirm what applies to your specific project.
What happens if waterproofing fails?
Failed waterproofing allows water to penetrate behind tiles and into the wall cavity, causing timber rot, mould, and damage to adjacent rooms. Remediation requires stripping the bathroom back to the substrate and re-waterproofing, a cost that typically exceeds the original renovation budget. This is why waterproofing inspection and certification before tiling begins is a legal requirement in New South Wales, not an optional step.
How do I know when my bathroom renovation is complete?
Your bathroom renovation is complete when all fixtures are installed and functioning, all silicone joints are applied and cured, the final inspection has been passed and documented, and your contractor has conducted a formal handover walkthrough with you. At handover, you should receive copies of all compliance certificates, waterproofing inspection records, and any warranty documentation for fixtures and workmanship.

