
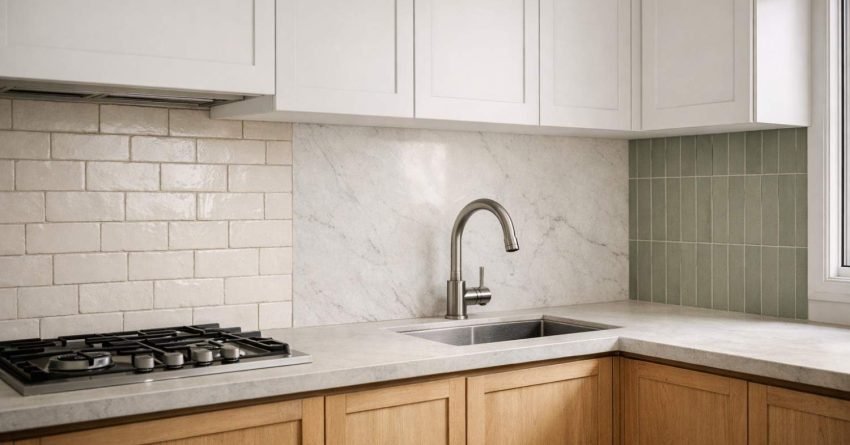
Your kitchen splashback does more than protect the wall behind your stove and sink. It sets the visual tone for the entire room and directly influences your renovation budget, daily maintenance routine, and long-term property value.
Choosing the right splashback material, colour, and style is one of the most impactful decisions in any kitchen renovation. Get it right, and you create a space that looks polished, functions well, and appeals to future buyers. Get it wrong, and you face costly replacements, cleaning headaches, or a dated look within a few years.
This guide covers every kitchen splashback idea worth considering in 2025. From popular materials and design styles to realistic Sydney pricing, installation advice, current trends, and the finishing details that most guides skip grout colour, tile layout patterns, and cleaning by material you will have everything you need to make a confident, budget-smart decision.
What Is a Kitchen Splashback?
A kitchen splashback is a protective surface installed on the wall between your benchtop and overhead cabinetry. It shields the wall from water, grease, food splatters, and heat generated during cooking. Splashbacks are typically installed behind the cooktop, sink, and along the full length of the benchtop area.
Beyond protection, the splashback is one of the most visible surfaces in your kitchen. It occupies prime visual real estate at eye level, making it a key design element that ties together your benchtops, cabinetry, flooring, and appliances.
Purpose and Function of a Splashback
The primary function is practical. Cooking generates grease, steam, and food particles that damage unprotected plasterboard and paintwork over time. A splashback creates a sealed, wipeable barrier that keeps your walls clean and structurally sound.
In NSW, the Building Code of Australia requires a splashback or equivalent water-resistant surface in wet areas around sinks and cooktops. This is not optional; any kitchen renovation in Sydney needs to meet these compliance standards, which means your splashback choice is both a design decision and a regulatory one.
A well-chosen splashback also simplifies daily cleaning. Smooth, non-porous surfaces like glass or large-format porcelain tiles reduce grout lines and make wiping down after cooking a quick task rather than a scrubbing session.
Why Your Splashback Choice Matters for Resale Value
Kitchen renovations are among the most visible improvements buyers notice when inspecting a property. The splashback, because it sits at eye level and spans the full working wall, plays an outsized role in how buyers perceive the quality and modernity of your kitchen.
A dated or poorly chosen splashback can make an otherwise well-renovated kitchen feel incomplete. Conversely, a well-matched splashback in a trending material or timeless design can elevate the entire space.
For property investors and landlords renovating for resale or rental yield, the splashback is a relatively low-cost element that delivers disproportionate visual impact. Spending an extra few hundred dollars on a quality splashback material often generates a stronger buyer response than spending the same amount on hidden structural upgrades.
Most Popular Kitchen Splashback Materials
Every splashback material comes with trade-offs between cost, durability, maintenance, and visual appeal. Understanding these trade-offs is the foundation of a smart renovation decision.
Ceramic and Porcelain Tiles
Ceramic and porcelain tiles remain the most widely used splashback material in Australian kitchens. They are affordable, available in thousands of colours, sizes, patterns, and finishes, and suitable for virtually any kitchen style.
Porcelain tiles are denser and more water-resistant than ceramic, making them the better choice for areas directly behind the sink. Subway tiles, the rectangular format popularised in early 20th-century New York subway stations, continue to dominate Sydney kitchens due to their clean lines and versatility.
Advantages: The range of styles and price points is enormous, and tiles are easy to source locally from Sydney suppliers. Individual damaged tiles can be replaced without redoing the entire splashback, which makes long-term maintenance straightforward.
Considerations: Grout lines require sealing and periodic maintenance. Smaller tiles mean more grout, which can discolour over time and become a cleaning burden.
Best for: Homeowners who want design flexibility and a proven, cost-effective material.
Glass Splashbacks
Glass splashbacks deliver a seamless, modern look with no grout lines. They are manufactured from toughened safety glass, typically 6mm thick, and back-painted in any colour you choose, which means you can colour-match your splashback precisely to your cabinetry, benchtop, or a feature colour.
The reflective quality of glass bounces light around the kitchen, making smaller spaces feel larger and brighter. This is particularly valuable in Sydney apartments and terraces where kitchen footprints are compact.
Advantages: The seamless surface with zero grout is extremely easy to clean. Glass is heat-resistant when toughened and creates a genuine sense of space and light that tiles cannot replicate.
Considerations: The upfront cost is higher than tiles, and installation requires precise measurement by a specialist. Fingerprints and water marks show more readily on dark glass colours.
Best for: Modern and contemporary kitchens where a clean, uninterrupted look is the priority.
Natural Stone Splashbacks
Natural stone splashbacks including marble, granite, travertine, and slate bring organic texture and unique veining patterns that no manufactured material can replicate. Each slab is one of a kind.
Marble splashbacks, particularly Calacatta and Carrara varieties, are a premium choice in high-end Sydney kitchen renovations. They pair beautifully with both traditional and contemporary cabinetry.
Advantages: The natural beauty is unmatched, and stone can be bookmatched with stone benchtops for a seamless, gallery-quality look. It adds significant perceived value to a property.
Considerations: Natural stone is porous and requires regular sealing. It is susceptible to staining from acidic foods like lemon juice, tomato sauce, and red wine, and the material and installation costs are higher than most alternatives.
Best for: Luxury renovations where budget allows for premium materials and ongoing maintenance.
Stainless Steel Splashbacks
Stainless steel is the professional kitchen standard for good reason. It is completely non-porous, heat-proof, hygienic, and virtually indestructible. In residential kitchens, it delivers a commercial, industrial aesthetic.
Advantages: Stainless steel is completely waterproof and hygienic, withstands extreme heat directly behind cooktops, and has a long lifespan with minimal maintenance requirements.
Considerations: It shows fingerprints, water spots, and scratches readily. The look can feel cold or clinical in some kitchen styles, and colour options are limited to the natural steel finish.
Best for: Industrial-style kitchens, serious home cooks, and anyone prioritising hygiene and durability above all else.
Acrylic and Polymer Splashbacks
Acrylic splashbacks offer a budget-friendly alternative to glass with a similar seamless appearance. They are lighter, easier to cut, and available in a wide range of colours and finishes, including metallic and gloss options.
Advantages: The lower cost compared to glass makes acrylic accessible for tight budgets. It is lightweight, easier to install, and produces no grout lines.
Considerations: Acrylic is not suitable directly behind gas cooktops due to lower heat resistance. It scratches more easily than glass and may yellow over time with prolonged UV exposure.
Best for: Budget-conscious renovations, rental properties, and kitchens with electric or induction cooktops.
Engineered Stone and Composite Splashbacks
Engineered stone such as Caesarstone, Silestone, and Dekton allows you to extend your benchtop material up the wall for a cohesive, integrated look. These materials are manufactured from crushed quartz or sintered minerals, offering consistent colour and pattern.
Advantages: The seamless benchtop-to-splashback transition is the standout benefit. Engineered stone is non-porous, stain-resistant, and extremely durable, with consistent colour and pattern across the full surface.
Considerations: The cost is higher, especially for premium brands, and professional templating and installation are required. The material is heavier than tiles or glass and is limited to the colour range offered by the manufacturer.
Best for: Kitchens where a unified, high-end material palette is the design goal.
Kitchen Splashback Ideas by Style
Your splashback should complement the overall design language of your kitchen. Here are the most popular style directions for Sydney kitchens in 2026.
Modern and Minimalist Splashback Ideas
Modern kitchens favour clean lines, neutral palettes, and uncluttered surfaces. The splashback in a minimalist kitchen should enhance this sense of calm and order.
Top choices: Large-format porcelain tiles in matte white or light grey. Back-painted glass in a single neutral tone. Engineered stone matching the benchtop. Slim-profile subway tiles in a stacked bond pattern rather than the traditional brick lay.
Design tip: In a minimalist kitchen, the splashback should blend rather than contrast. Choose a material and colour that sits within the same tonal family as your cabinetry and benchtop; the goal is visual continuity, not a feature wall.
Hamptons and Coastal Splashback Ideas
The Hamptons style remains one of the most requested kitchen aesthetics in Sydney, particularly in the Eastern Suburbs, Northern Beaches, and Sutherland Shire. It combines white and soft blue-grey tones with natural textures and classic detailing.
Top choices: White subway tiles with a bevelled edge in a traditional brick lay pattern. Marble-look porcelain tiles. Shiplap-style panelling in moisture-resistant materials. Soft grey glass splashbacks.
Design tip: The classic Hamptons splashback is a white subway tile with light grey grout. For a more contemporary take, use a larger format tile or a marble-look porcelain to reduce grout lines while maintaining the coastal aesthetic.
Industrial and Urban Splashback Ideas
Industrial kitchens draw inspiration from converted warehouses and commercial spaces. Raw materials, exposed surfaces, and utilitarian finishes define this style.
Top choices: Stainless steel panels. Concrete-look porcelain tiles. Dark-toned subway tiles in charcoal or black. Exposed brick sealed with a clear waterproof coating. Aged brass or copper sheet panels.
Design tip: Pair an industrial splashback with open shelving, matte black tapware, and timber benchtops to balance the raw aesthetic with warmth.
Classic and Traditional Splashback Ideas
Traditional kitchens suit splashbacks with heritage character, intricate patterns, and warm tones. These kitchens are common in Sydney’s older suburbs where period homes are being renovated to preserve character while updating functionality.
Top choices: Hand-glazed ceramic tiles with irregular edges. Patterned encaustic tiles. Marble or marble-look tiles in a herringbone pattern. Pressed tin panels for a heritage look.
Design tip: In a traditional kitchen, the splashback is an opportunity to introduce pattern and texture. A herringbone marble tile or a hand-painted ceramic tile adds artisan character that complements timber cabinetry and stone benchtops.
Bold and Statement Splashback Ideas
For homeowners who want their kitchen to make an impression, the splashback is the ideal canvas for a bold design move.
Top choices: Patterned Moroccan or Mediterranean tiles. Terrazzo-look tiles in oversized formats. Jewel-toned glass in emerald, navy, or deep burgundy. Zellige tiles with their handmade, irregular surface. Printed glass featuring custom artwork or photography.
Design tip: When using a bold splashback, keep the rest of the kitchen restrained. Neutral cabinetry, simple benchtops, and minimal accessories allow the splashback to be the hero without the space feeling overwhelming.
Kitchen Splashback Ideas on a Budget
A tight renovation budget does not mean you have to settle for a boring splashback. Some of the most effective kitchen transformations come from smart material choices and strategic spending.
Affordable Materials That Look Expensive
Subway tiles remain the best value proposition in kitchen splashbacks. A standard white ceramic subway tile costs as little as $20 to $40 per square metre, yet delivers a timeless look that works in almost any kitchen style.
Large-format porcelain tiles that mimic marble, concrete, or natural stone have improved dramatically in quality. A porcelain tile that convincingly replicates Calacatta marble costs a fraction of the real stone and requires none of the sealing or maintenance.
Peel-and-stick tiles and vinyl splashback panels have entered the market as a temporary or rental-friendly option. While not suitable for areas directly behind gas cooktops, they can transform a kitchen visually for well under $200 (/budget-kitchen-splashback-options).
DIY-Friendly Splashback Options
If you have basic handyman skills, several splashback options are achievable without a professional tiler. Acrylic panels can be cut to size with standard tools and adhered directly to the wall with construction adhesive. Peel-and-stick subway tiles require no grout, no special tools, and no trade experience.
Be realistic about your skill level, though. A poorly installed splashback with uneven edges, visible adhesive, or gaps at the benchtop line will detract from your kitchen rather than enhance it. For tiled splashbacks, professional installation is almost always worth the labour cost.
Best Splashback Options for Rental Properties
Rental properties need splashbacks that survive tenants, clean easily, and cost little to replace if damaged. Acrylic panels and large-format porcelain tiles are the two strongest choices for this context.
Acrylic is inexpensive, installs quickly, and replaces without major disruption. Large-format porcelain tiles have fewer grout lines to stain, are highly durable, and look far more premium than their price suggests. Avoid natural stone and handmade tiles in rental kitchens; the maintenance requirements and replacement costs are too high for an investment property context.
Where to Save and Where to Spend
Save on: Splashback areas that are less visible, such as behind the fridge or in pantry alcoves. A simpler, cheaper tile works well in these zones.
Spend on: The area directly behind the cooktop and sink. This is where your eye naturally lands and where the splashback needs to perform hardest against heat, grease, and water.
Smart strategy: Use a premium tile or material for the cooktop zone and a complementary but less expensive option for the remaining splashback areas. This creates visual interest while keeping costs controlled.
How to Choose the Right Splashback for Your Kitchen
With so many materials, colours, and styles available, narrowing down your choice can feel like a lot. These practical considerations will help you make a decision you will be happy with for years.
Matching Your Splashback to Benchtops and Cabinetry
Your splashback sits between two dominant surfaces: the benchtop below and the cabinetry above. It needs to work with both.
Complementary approach: Choose a splashback that shares a colour tone with either the benchtop or the cabinetry but is not identical to either. A white marble-look splashback pairs well with a dark timber benchtop and white cabinetry, for example.
Matching approach: Extend your benchtop material up the wall as the splashback. This works particularly well with engineered stone and creates a seamless, high-end look.
Contrast approach: Use the splashback as a deliberate contrast point. A dark charcoal tile against white cabinetry and a light benchtop creates a striking focal point.
Always view material samples together in your kitchen, under your kitchen’s actual lighting. Colours look different under showroom lights than they do under your downlights or natural light.
Considering Maintenance and Durability
Your splashback will be exposed to cooking grease, water splashes, steam, and heat every day. Choose a material that matches your willingness to maintain it.
| Material | Cleaning Ease | Heat Resistance | Stain Resistance | Longevity |
| Glass | Excellent | High | Excellent | 15–20+ years |
| Porcelain Tile | Good | High | Very Good | 20+ years |
| Ceramic Tile | Good | Moderate–High | Good | 15–20 years |
| Natural Stone | Moderate | High | Low (requires sealing) | 20+ years with care |
| Stainless Steel | Good | Excellent | Excellent | 20+ years |
| Acrylic | Good | Low–Moderate | Good | 8–12 years |
| Engineered Stone | Excellent | High | Excellent | 20+ years |
If you cook frequently with oil and high heat, prioritise non-porous materials like glass, stainless steel, or engineered stone. If your kitchen is more of a light-use space, you have more flexibility to choose based on aesthetics alone.
How to Clean Your Splashback by Material
Cleaning requirements vary significantly between materials, and knowing what you are signing up for before you buy is worth the two minutes it takes to read.
Glass and acrylic: A damp microfibre cloth removes most grease and splatter. For stubborn residue, a small amount of white vinegar solution works without scratching the surface. Avoid abrasive pads on both materials.
Porcelain and ceramic tiles: Wipe the tile face with a damp cloth after cooking. Grout lines need a soft brush and a pH-neutral cleaner weekly in high-use kitchens. Re-seal grout every one to two years to prevent staining and discolouration.
Natural stone: Use only pH-neutral stone cleaners; acidic products like vinegar or lemon-based sprays etch the surface permanently. Seal the stone every six to twelve months depending on use. Wipe spills immediately, particularly red wine, tomato, and citrus.
Stainless steel: Wipe with the grain using a damp cloth and a small amount of dish soap. A stainless steel polish applied monthly keeps fingerprints and water spots under control. Avoid steel wool or abrasive pads.
Engineered stone: Wipe with warm soapy water. Engineered stone is non-porous and requires no sealing, making it one of the lowest-maintenance options available.
Splashback Sizing and Layout Considerations
The standard splashback height in Australian kitchens is 450mm to 600mm, measured from the top of the benchtop to the underside of the overhead cabinets. Behind the cooktop, the splashback often extends higher, particularly if you have a rangehood with an exposed flue in that case, the splashback typically runs to the underside of the rangehood canopy or to the ceiling.
Full-height vs. standard height: Full-height splashbacks that run from benchtop to ceiling work best in kitchens without overhead cabinets, or where a dramatic visual statement is the goal. Standard-height splashbacks are the practical choice in most Sydney kitchens with overhead cabinetry, where the cabinet base defines the natural stopping point. The decision comes down to your cabinet configuration and how much visual weight you want the splashback to carry.
Window splashbacks require careful planning. If your kitchen has a window above the sink, the splashback material needs to frame the window neatly. Tiles are generally easier to work around windows than large glass panels, which require precise templating around the frame.
Return edges are the short sections of splashback that wrap around the end of a benchtop run. These are easy to overlook during planning but essential for a finished, professional look.
Tile Layout Patterns That Work in Sydney Kitchens
The pattern you choose for a tiled splashback changes the entire character of the surface, even when the tile itself is identical. This is one of the most underestimated decisions in kitchen design.
Brick lay (running bond): The classic offset pattern where each tile is staggered by half a tile width. It is the default for subway tiles and works in virtually every kitchen style. It reads as traditional and familiar.
Stacked bond: Tiles aligned in a straight grid, both horizontally and vertically. This pattern reads as more contemporary and architectural than brick lay. It suits minimalist and modern kitchens particularly well.
Herringbone: Rectangular tiles arranged at 90-degree angles to create a V-shaped zigzag. Herringbone adds significant visual complexity and works best in traditional, Hamptons, and statement kitchens. It requires more cutting and therefore higher installation labour costs.
Chevron: Similar to herringbone but with tiles cut at an angle so the points align perfectly. The result is a sharper, more graphic pattern. It is less common than herringbone and suits bold or contemporary kitchens.
Vertical stack: Standard rectangular tiles laid vertically rather than horizontally. This pattern makes ceilings feel higher and suits narrow kitchen layouts where vertical emphasis helps the space feel less compressed.
Choosing the Right Grout Colour
Grout colour is the finishing decision that most homeowners underestimate and the one that most often determines whether a tiled splashback looks polished or amateurish.
Matching grout: Choosing a grout colour that closely matches the tile creates a near-seamless look that emphasises the tile itself. This works well with large-format tiles and marble-look porcelain, where you want the material to read as a continuous surface.
Contrasting grout: A dark grout with white tiles, charcoal or black with white subway tiles, for example, makes the tile pattern the feature. It reads as deliberate and graphic. The trade-off is that contrasting grout shows dirt and discolouration more readily over time.
Practical rule: In high-use kitchens, mid-tone grout in grey or greige is the most forgiving choice. It neither shows every mark like white grout nor telegraphs every stain like dark grout. It also works with a wider range of tile colours than either extreme.
Kitchen Splashback Cost Guide for Sydney Homeowners
Understanding realistic costs helps you budget accurately and avoid surprises during your renovation. Splashback costs in Sydney vary significantly based on material, size, complexity, and whether you hire a professional installer. The splashback is one component within a broader kitchen renovation budget that covers cabinetry, benchtops, appliances, and trades. Understanding how each element fits together helps you allocate spend where it delivers the most value.
Average Splashback Costs by Material
These figures represent typical supply costs per square metre for materials commonly available in Sydney, excluding installation.
| Material | Budget Range (per m²) | Mid-Range (per m²) | Premium Range (per m²) |
| Ceramic Tiles | $20 – $50 | $50 – $100 | $100 – $180 |
| Porcelain Tiles | $30 – $60 | $60 – $120 | $120 – $250 |
| Glass (back-painted) | $180 – $280 | $280 – $400 | $400 – $600+ |
| Natural Stone | $100 – $200 | $200 – $400 | $400 – $800+ |
| Stainless Steel | $150 – $250 | $250 – $400 | $400 – $600 |
| Acrylic | $80 – $150 | $150 – $250 | $250 – $350 |
| Engineered Stone | $200 – $350 | $350 – $500 | $500 – $700+ |
For a typical Sydney kitchen with approximately 2 to 4 square metres of splashback area, total material costs range from as little as $80 for budget ceramic tiles to over $2,800 for premium engineered stone.
Installation Costs and Labour in Sydney
Professional tiling labour in Sydney typically ranges from $60 to $100 per square metre for standard splashback installation. Complex patterns like herringbone or mosaic layouts attract higher labour rates due to the additional cutting and fitting time required.
Glass splashback installation is a specialist trade. Expect to pay $150 to $300 for measurement, templating, and installation of a standard glass panel, on top of the material cost.
Engineered stone splashback installation is usually handled by the same fabricator who installs your benchtop. Bundling both jobs together often reduces the overall cost compared to sourcing them separately.
Total installed cost example: A mid-range porcelain tile splashback covering 3 square metres in a Sydney kitchen typically costs between $360 and $660 for materials plus $180 to $300 for labour, bringing the total to approximately $540 to $960 installed.
Hidden Costs to Watch For
Several costs catch homeowners off guard during splashback renovations.
Removal of existing splashback. If you are replacing an old splashback, demolition and disposal can add $200 to $500 depending on the material and area.
Wall preparation. Walls behind old splashbacks are rarely in perfect condition. Patching, plastering, and waterproofing can add $150 to $400.
Electrical and plumbing adjustments. Powerpoints and light switches within the splashback zone may need to be relocated or have their cover plates updated to sit flush with the new surface.
Grout and adhesive. For tiled splashbacks, quality grout and adhesive are essential but often excluded from initial tile quotes. Budget an additional $50 to $150 for these consumables.
Edging and finishing. Exposed tile edges, end caps, and silicone sealing around benchtops and cabinetry require finishing materials and labour that are sometimes quoted separately.
Kitchen Splashback Installation Process
Understanding the installation process helps you plan your renovation timeline and coordinate trades effectively.
Preparing Your Kitchen for a New Splashback
Before installation day, several preparation steps need to happen. Clear the benchtop completely; remove all appliances, canisters, and items from the benchtop and any shelving in the splashback zone. Protect your benchtop surface with drop sheets or cardboard.
If you are replacing an existing splashback, the old material needs to be removed first. Tiles are chipped off, adhesive residue is scraped away, and the wall surface is assessed for damage.
The wall must be clean, dry, flat, and structurally sound. Any holes, cracks, or uneven areas need to be patched and sanded. For wet areas behind sinks, a waterproof membrane may be required under the splashback. Ensure all electrical and plumbing work is completed before the splashback goes on. Moving a powerpoint after the splashback is installed means cutting into your new surface.
Professional Installation vs DIY
For tiled splashbacks, professional installation is recommended unless you have genuine tiling experience. A splashback is a highly visible surface at eye level; uneven grout lines, lippage between tiles, or poor cuts around powerpoints are immediately noticeable and difficult to fix after the fact.
Glass and engineered stone splashbacks require professional installation without exception. These materials are custom-fabricated to precise measurements and require specialist handling, cutting, and fitting.
Acrylic panels and peel-and-stick options are the most DIY-accessible. If you are comfortable with measuring, cutting, and using construction adhesive, these can be a satisfying weekend project. The cost of fixing a bad DIY splashback almost always exceeds the cost of professional installation in the first place; factor this into your budget decision.
How Long Does Splashback Installation Take?
A professional tiler can typically install a standard tiled splashback in one day, with grouting completed the following day. Allow 48 hours before the splashback is fully cured and ready for normal use.
Glass splashback installation is faster on site, usually completed in two to three hours. The lead time for manufacturing the glass panel is typically two to three weeks from measurement to delivery, so factor this into your renovation timeline.
Engineered stone splashbacks follow a similar timeline to glass. Templating happens after your benchtop is installed, fabrication takes one to two weeks, and on-site installation is completed in a few hours. Plan your renovation sequence carefully; the splashback is one of the last elements installed in a whole-home renovation, after cabinetry, benchtops, and plumbing.
Kitchen Splashback Trends in Sydney for 2026
Sydney’s kitchen design trends reflect a blend of global influences and local lifestyle preferences. Here is what is gaining momentum this year.
Trending Colours and Finishes
Warm neutrals are overtaking cool greys. Greige, warm white, oatmeal, and soft clay tones are replacing the stark white and cool grey palettes that dominated Sydney kitchens over the past decade.
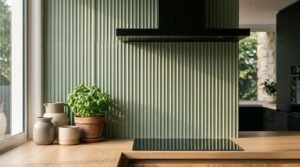
Green tones continue to grow in popularity. Sage, olive, and forest green splashbacks pair naturally with timber cabinetry and brass hardware, reflecting the broader biophilic design movement.
Matte finishes are gaining ground over high-gloss. Matte and satin-finish tiles and glass panels create a softer, more sophisticated look that hides fingerprints and water marks better than gloss surfaces.
Textured and Three-Dimensional Splashbacks
Flat surfaces are giving way to tactile, three-dimensional options. Fluted tiles, ribbed glass panels, and handmade zellige tiles with their characteristic undulating surface add depth and visual interest to the splashback zone.
Zellige tiles, a traditional Moroccan handmade tile, have surged in popularity in Sydney. Their irregular surface catches light differently across each tile, creating a living, dynamic surface that changes character throughout the day.
Fluted or reeded panels, whether in glass, timber-look material, or concrete, echo the vertical ribbing trend seen in cabinetry and furniture design. Applied to a splashback, they add architectural texture without introducing colour or pattern.
Full-Height and Extended Splashback Designs
The trend toward removing overhead cabinets in favour of open shelving or rangehood feature walls has created demand for full-height splashbacks that extend from benchtop to ceiling. This approach works particularly well with large-format porcelain slabs, stone slabs, and glass panels; the uninterrupted surface creates a dramatic backdrop and makes the kitchen feel taller and more open.
Extended splashbacks that wrap around corners, cover island bench ends, or continue into adjacent butler’s pantries are also increasingly common in Sydney’s open-plan living spaces. This creates visual continuity between the kitchen and living areas.
Conclusion
Choosing the right kitchen splashback involves balancing aesthetics, functionality, maintenance, and budget. Whether you prefer the timeless appeal of subway tiles, the seamless look of glass, or the luxury of natural stone, every material has a place depending on your kitchen style, cooking habits, and renovation goals.
For Sydney homeowners and property investors, the splashback is a high-impact, relatively low-cost element that shapes how your entire kitchen looks and feels. Investing time in selecting the right material, colour, layout pattern, and grout colour pays dividends in daily satisfaction and long-term property value.
At Sydney Home Renovation, we help homeowners make confident splashback and kitchen renovation decisions backed by honest pricing, practical expertise, and clear communication from first conversation to final installation. If you are planning a kitchen renovation and want straightforward guidance on materials, costs, and what will work best for your space, get in touch with our team today.
Frequently Asked Questions
What is the most durable kitchen splashback material?
Engineered stone and stainless steel are the most durable kitchen splashback materials. Both are non-porous, heat-resistant, and stain-resistant, with lifespans exceeding 20 years. Toughened glass is also extremely durable and virtually maintenance-free.
How much does a kitchen splashback cost in Sydney?
A kitchen splashback in Sydney typically costs between $540 and $2,500 installed, depending on the material and area. Budget ceramic tiles start from around $20 per square metre for materials, while premium engineered stone can exceed $700 per square metre before installation.
Can you install a splashback over existing tiles?
Yes, in some cases. Glass and acrylic panels can be installed over existing tiles if the surface is flat, stable, and in good condition. Tiling over tiles adds thickness and can create issues around powerpoints and cabinetry edges, so removing the old tiles first generally produces a better result.
What splashback is best for behind a stove?
Toughened glass, porcelain tiles, stainless steel, and engineered stone are all excellent choices behind a stove. These materials withstand high heat and are easy to clean. Avoid acrylic panels directly behind gas cooktops, as they have lower heat tolerance.
Are glass splashbacks outdated?
No. Glass splashbacks remain a popular and contemporary choice in Sydney kitchens. The trend has shifted from bold, bright colours toward neutral tones, matte finishes, and textured glass options. A well-chosen glass splashback in a current colour still looks modern and sophisticated.
What is the cheapest kitchen splashback option?
Standard white ceramic subway tiles are the most affordable splashback option, starting from around $20 per square metre for materials. Peel-and-stick tile panels are even cheaper for a temporary or rental-friendly solution, though they are not suitable for high-heat areas.
Do I need a splashback by law in NSW?
The Building Code of Australia requires water-resistant surfaces in wet areas, including behind kitchen sinks. While the code does not mandate a specific splashback product, the wall surface behind your sink and cooktop must meet moisture resistance standards. A dedicated splashback is the most practical and common way to meet this requirement in NSW.
How do I clean a kitchen splashback?
The Cleaning method depends on the material. Glass and engineered stone wipe clean with a damp cloth and mild detergent. Tiled splashbacks need a soft brush on grout lines weekly. Natural stone requires pH-neutral cleaners; only acidic products like vinegar will etch the surface permanently.
What is the best splashback for a rental property?
Large-format porcelain tiles and acrylic panels are the best choices for rental properties. Both are durable, easy to clean, cost-effective to replace if damaged, and require minimal ongoing maintenance. Avoid natural stone and handmade tiles in rental kitchens due to higher maintenance and replacement costs.


