
Shower waterproofing is the single most important step in any bathroom renovation and the one most likely to cause catastrophic, expensive damage when it’s done poorly. I’ve seen what happens when it’s skipped or rushed, and the repair bills make the original waterproofing cost look trivial. This matters whether you’re renovating a family bathroom, an ensuite, or an investment property.
Water doesn’t forgive shortcuts. A failed membrane means structural rot, mould, and a full retile at minimum.
In this guide, I’ll walk through what shower waterproofing actually is, why it’s non-negotiable, and exactly how the process works from surface prep to tiling.
What Is Shower Waterproofing?
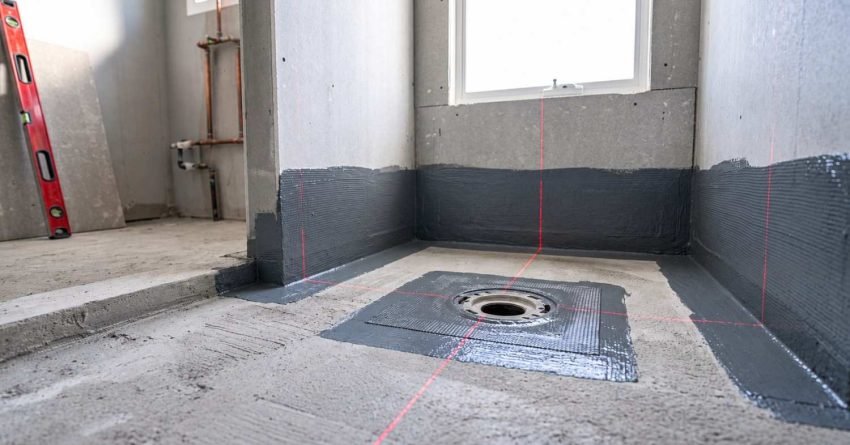
Shower waterproofing is the process of applying a continuous, impermeable barrier to the floor and walls of a shower recess before tiles are installed. Its job is to stop water from penetrating the substrate beneath the tiles and reaching the structural elements of the building.
Without it, every shower you take sends water into places it was never meant to go. The tiles and grout slow that process down, but they don’t stop it.
The Difference Between Water-Resistant and Waterproof
Water-resistant and waterproof are not the same thing, and confusing them is one of the most common mistakes I see in bathroom renovations. Water-resistant materials slow water absorption. Waterproof materials stop it entirely.
Tiles and grout are water-resistant. They handle surface moisture well, but they are not a barrier against sustained water exposure. The waterproofing membrane underneath the tiles is what actually keeps water out of the substrate.
This distinction matters because some renovators assume tiling alone is sufficient protection. It isn’t. The membrane does the real work.
Where Waterproofing Is Applied in a Shower
In a standard shower recess, waterproofing is applied to the entire floor, the lower section of all walls, and the hob or threshold. The membrane must extend a minimum height up the walls, typically 150mm above the floor for internal walls and higher at the shower head wall, and it must wrap around the floor waste.
Every internal corner and junction point gets reinforcing fabric tape embedded into the membrane. These are the highest-risk areas for cracking and water ingress, so they need extra attention.
Why Shower Waterproofing Is Critical
The short answer: water finds every gap, and once it gets into a substrate, the damage compounds silently for months before you notice anything. By the time visible signs appear, the structural and remediation costs are already significant.
Waterproofing is not a premium upgrade. It is a fundamental requirement of any compliant bathroom renovation in Australia.
Structural Damage and Substrate Failure
Water that penetrates a shower substrate attacks whatever is behind it. In timber-framed homes, which make up the majority of residential construction in Sydney, that means the framing, noggins, and subfloor are exposed to sustained moisture. Timber rots. It loses structural integrity quietly, and by the time the floor feels soft underfoot, the damage is extensive.
In concrete or fibre cement substrate construction, water ingress causes delamination, efflorescence, and eventually cracking. The substrate breaks down and can no longer support the tile system above it.
Mould, Mildew, and Health Risks
Hidden moisture behind tiles creates the perfect environment for mould growth. The Australian Institute of Health and Welfare identifies poor housing conditions, including dampness and mould, as a direct contributor to respiratory health problems. Mould behind shower tiles is particularly insidious because it’s invisible until the damage is severe.
Mildew and mould spores circulate through bathroom air every time the shower runs. For households with children, elderly residents, or anyone with respiratory conditions, this is a genuine health concern, not just an aesthetic one.
The Cost of Getting It Wrong
Fixing a failed shower waterproofing job means stripping every tile, removing the failed membrane, re-prepping the substrate, reapplying compliant waterproofing, and retiling from scratch. In Sydney, that remediation process typically costs more than a full bathroom renovation would have cost if done the first time correctly.
I’ve seen homeowners spend $8,000 to $15,000 fixing a shower that was originally tiled over inadequate or missing waterproofing. The original waterproofing, done properly, would have added a fraction of that to the project cost.
How Shower Waterproofing Is Done Step by Step
The process follows a clear sequence. Skipping or rushing any stage compromises the entire system. Here’s how we approach it on every bathroom renovation we complete.
Surface Preparation
Before any membrane goes down, the substrate has to be clean, dry, sound, and free of dust, oil, and loose material. Any cracks or voids in the substrate are filled and allowed to cure fully before waterproofing begins.
A primer is applied to the prepared surface to improve adhesion between the substrate and the membrane. The primer must be compatible with the membrane system being used; mixing products from different systems is a common source of adhesion failure.
Membrane Selection and Application
The membrane is applied in a minimum of two coats, with reinforcing fabric tape embedded into the wet membrane at all internal corners, junctions, and around the floor waste. Each coat must reach the manufacturer’s specified wet film thickness to achieve the required dry film thickness after curing.
Liquid membranes are applied by brush or roller. The first coat is allowed to cure to the touch before the second coat goes on. The second coat is typically applied in the opposite direction to the first to ensure even coverage and eliminate pinholes.
Wet Area Compliance and Curing Time
In New South Wales, shower waterproofing must comply with AS 3740-2010, the Australian Standard for waterproofing of domestic wet areas. This standard specifies minimum upstand heights, membrane coverage areas, and application requirements.
The membrane must cure fully before tiling begins. Most liquid membrane systems require a minimum of 24 to 48 hours curing time, though this varies by product and ambient conditions. Tiling over an insufficiently cured membrane is one of the most common causes of early system failure.
Tiling Over a Waterproofed Substrate
Once the membrane has cured completely, tiling can begin. The tile adhesive is applied directly to the membrane surface using a notched trowel, and tiles are bedded firmly to eliminate voids beneath them.
Voids under tiles caused by insufficient adhesive coverage allow tiles to flex under foot traffic, which cracks the grout and eventually the membrane below. Full adhesive coverage is not optional in a wet area.
Waterproofing Materials and Systems Used in Sydney
The Sydney market has access to a range of high-quality waterproofing systems. The right choice depends on the substrate type, the application method, and the specific requirements of the project.
We work with systems from manufacturers including Ardex, Mapei, and Laticrete, all of which produce products tested and certified to Australian standards. Product quality matters, but application quality matters more. A premium membrane applied incorrectly will fail faster than a standard membrane applied correctly.
Sheet Membranes vs. Liquid Membranes
Sheet membranes are pre-formed, consistent-thickness barriers bonded to the substrate with adhesive. They offer predictable thickness and are particularly effective in large floor areas. Their limitation is at corners and junctions, where cutting and overlapping create potential weak points that require careful detailing.
Liquid membranes are applied wet and cure to form a seamless, monolithic barrier. They conform to any substrate shape and are easier to detail at corners and penetrations. The trade-off is that achieving consistent thickness requires careful application technique and wet film thickness gauging.
For most residential shower recesses in Sydney, liquid membranes are the preferred system because of their seamless application and flexibility at junctions.
What the Australian Standard AS 3740 Requires
AS 3740-2010 is the governing standard for wet area waterproofing in Australia, and compliance is mandatory under the National Construction Code. The standard specifies minimum upstand heights of 150mm for internal walls in a shower recess, 1,800mm for the wall at the shower head, and requires that the membrane extend to cover the full floor area and all junctions.
In NSW, waterproofing in a shower recess must be carried out by a licensed waterproofer or a licensed builder. The work is inspectable, and non-compliant waterproofing is a defect under the NSW Home Building Act 1989, which carries statutory warranty obligations for licensed contractors.
Common Waterproofing Mistakes That Lead to Failures
Most shower waterproofing failures I’ve seen trace back to a small number of recurring mistakes. Insufficient membrane coats and applying one coat where two are required are the most common. The membrane ends up below the minimum dry film thickness and doesn’t perform as rated.
Missed or poorly detailed corners are the second most frequent failure point. Water finds corners first. If the reinforcing tape isn’t embedded correctly, or if the membrane thins out at the junction, that’s where the leak starts.
Tiling too soon is the third. Contractors under schedule pressure tile over membranes that haven’t fully cured. The membrane continues to off-gas moisture as it cures, which compromises adhesion and can cause the tile system to delaminate.
Signs Your Shower Waterproofing Has Failed
The earliest sign is usually grout cracking or discolouration in a pattern that follows the tile joints. This indicates movement in the substrate below, which means water has already penetrated and is causing damage.
Efflorescence white mineral deposits appearing on grout or tile surfaces is another early indicator. It means water is moving through the substrate and carrying dissolved salts to the surface. Loose or hollow-sounding tiles, a persistent damp smell, and staining on the wall or ceiling of the room below the shower are all signs that the waterproofing has failed and remediation is needed.
How Long Does Shower Waterproofing Last?
A correctly applied, compliant waterproofing membrane in a residential shower has a functional lifespan of 10 to 15 years under normal use conditions. The membrane itself doesn’t wear out; what degrades over time is the grout and the silicone sealant at junctions, which are the points where water can eventually find a path through.
Regular maintenance, regrouting when grout shows signs of cracking or erosion, and replacing silicone at junctions every five to seven years extends the effective life of the waterproofing system significantly. The membrane underneath stays intact as long as the tile system above it remains sound and the junctions are maintained.
When a bathroom is renovated and retiled, the waterproofing must be redone. You cannot tile over an existing membrane and assume it remains compliant; the new tile system changes the load and movement characteristics of the substrate, and the existing membrane may be damaged during tile removal.
Frequently Asked Questions
How much does shower waterproofing cost in Sydney?
Waterproofing a standard shower recess in Sydney typically costs between $300 and $800 as a standalone trade item, depending on the size of the recess and the membrane system used. As part of a full bathroom renovation, it’s included in the overall scope and priced accordingly.
Can I waterproof a shower myself?
In NSW, waterproofing a shower recess requires a licensed waterproofer or licensed builder. DIY waterproofing in a shower is not compliant with AS 3740 or the NSW Home Building Act, and non-compliant work creates significant liability issues when selling or insuring the property.
How long does waterproofing take to cure before tiling?
Most liquid membrane systems require 24 to 48 hours of curing time before tiling. The exact period depends on the product, the number of coats applied, and ambient temperature and humidity. Always follow the manufacturer’s specified curing time. Tiling early is one of the most common causes of system failure.
Do I need a licensed waterproofer in NSW?
Yes. Under NSW licensing requirements, waterproofing in a shower recess is a licensed trade activity. The work must be carried out by a licensed waterproofer or a licensed builder who holds the appropriate endorsement. Unlicensed waterproofing work is a defect under the Home Building Act.
What happens if shower waterproofing fails?
A failed waterproofing membrane allows water to penetrate the substrate continuously. The result is structural damage to framing or concrete, mould growth behind tiles, delamination of the tile system, and eventually visible damage to adjacent walls, floors, or ceilings. Remediation requires full tile removal, substrate repair, and a complete redo of the waterproofing and tiling.
How do I know if my shower has been waterproofed correctly?
The most reliable indicator is documentation: a licensed contractor provides a certificate of compliance confirming the waterproofing meets AS 3740. Without documentation, a building inspector or licensed waterproofer can assess the shower, though this is limited to visible indicators. When buying a property, always request waterproofing compliance documentation for any wet areas.
Conclusion
Shower waterproofing is where bathroom renovations succeed or fail long-term. The membrane, the compliance standard, and the application process are not details; they are the foundation that everything else sits on.
Getting it right the first time protects the structural integrity of the building, the health of the people using it, and the financial investment of the renovation itself.
At Sydney Home Renovation, we treat waterproofing as the non-negotiable first step in every bathroom project. Reach out to our team and let’s make sure your renovation is built to last.


