
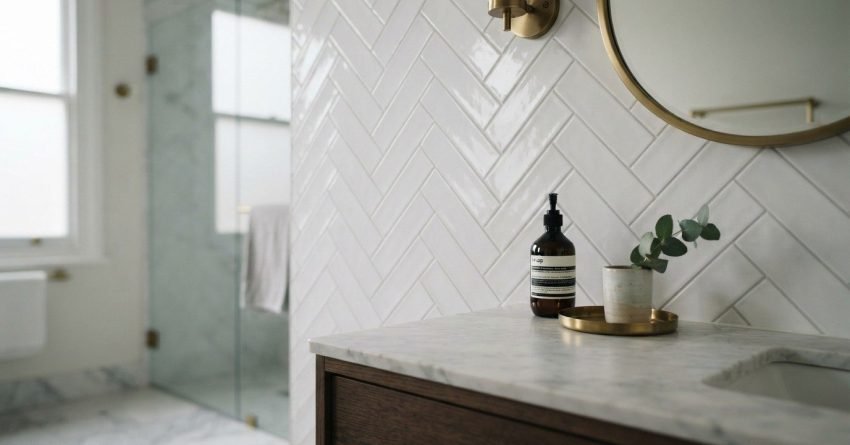
Subway tiles are one of the most versatile wall tile choices available for bathrooms, and the layout pattern you choose changes everything about how the finished space looks and feels. The same tile in a running bond reads completely differently from a herringbone or a vertical stack, and understanding those differences before you commit saves you from a result you’ll want to redo in two years.
Getting the layout right matters as much as the tile itself. The pattern, grout colour, and tile size all work together to define the character of your bathroom.
In this guide, I cover the most popular subway tile layout patterns, how grout colour and tile size shift the outcome, practical design ideas for Sydney bathrooms, and what the work typically costs.
Why Subway Tiles Work So Well in Bathrooms
Subway tiles have been a bathroom staple for well over a century, and they’ve earned that position. They’re not trendy in the way that makes you nervous; they’re foundational.
The reason they keep appearing in bathroom renovations across Sydney isn’t nostalgia. It’s because they genuinely perform well in the space.
The Classic Appeal of a Rectangular Format
The 1:2 rectangular format is the core of what makes subway tiles so adaptable. That ratio creates a natural horizontal emphasis that widens a space visually, and it gives tilers a geometry that works cleanly in almost any room shape.
Rotate the tile to vertical, and you get height. Angle it to 45 degrees, and you get movement. The rectangle is the starting point for every layout variation covered in this guide.
It’s a format that reads as both classic and contemporary depending entirely on how you use it.
Durability, Moisture Resistance, and Practicality
Glazed ceramic subway tiles are built for wet environments. The glaze creates a non-porous surface that resists water absorption, mould growth, and staining, which is exactly what a bathroom wall needs.
They’re also straightforward to clean. A damp cloth handles most of what a bathroom throws at a wall, and the smooth surface doesn’t trap grime the way textured tiles can.
For a space that takes daily moisture and steam, subway tiles are a practical choice that doesn’t ask much of you over time.
The Most Popular Subway Tile Layout Patterns
The pattern is where the real design decision happens. Tile selection matters, but layout direction and offset determine the visual weight, movement, and character of the finished wall.
These are the five patterns I see most often in Sydney bathroom renovations, and each one produces a genuinely different result.
Running Bond (Brick Offset) – The Default Choice
Running bond is the classic subway tile layout each row offset by 50% from the row above, exactly the way bricks are laid. It’s the pattern most people picture when they think of subway tiles.
The offset creates a subtle horizontal movement across the wall that feels natural and grounded. It’s familiar without being boring, and it works in bathrooms of almost any size or style.
This is the layout I’d recommend as a starting point for anyone who isn’t sure which direction to go. It’s reliable, it ages well, and it suits everything from heritage terraces to contemporary apartments.
Stacked (Grid) Layout – Clean and Contemporary
The stacked layout aligns every tile directly above the one below it, creating a clean grid of continuous vertical and horizontal grout lines. There’s no offset; every joint lines up perfectly.
The result is sharper and more structured than running bond. It reads as modern and minimal, and it works particularly well with larger format subway tiles where the grid lines become a deliberate design feature rather than a background detail.
One practical note: the stacked layout is less forgiving of minor tile size variations. Rectified tiles cut to precise dimensions are the better choice here.
Herringbone – Directional Drama Without Complexity
Herringbone arranges tiles at 90-degree angles to each other in a repeating V-shape pattern. It creates strong directional movement and a sense of visual complexity that the other layouts don’t produce.
It’s a natural choice for feature walls and shower niches where you want the tiling itself to be the focal point. The pattern draws the eye and holds it.
The trade-off is labour. Herringbone requires more precise cutting and takes longer to set out correctly, which adds to installation cost. But in the right space, the result justifies it completely.
Vertical Stack – Height and Elongation
Turning the tile to portrait orientation and stacking it vertically is one of the most effective ways to make a bathroom feel taller. The continuous vertical lines draw the eye upward and create a sense of height that horizontal layouts don’t produce.
It’s a particularly useful layout in bathrooms with standard or lower ceiling heights, where you want to create the impression of more vertical space without structural changes.
Vertical stack works well as a full-wall treatment or as a feature behind a vanity or bath.
Diagonal Layout – Movement and Visual Interest
The diagonal layout rotates standard subway tiles to 45 degrees, which creates a dynamic, energetic pattern across the wall. It’s less common than the other layouts, which is part of its appeal; it reads as considered and deliberate.
The practical consideration is waste. Cutting tiles at 45 degrees to fit edges and corners produces more offcuts than a horizontal or vertical layout, so you’ll need to factor in a higher material allowance, typically 15–20% extra rather than the standard 10%.
It suits bathrooms where the design brief calls for something with more personality.
Choosing the Right Grout Colour for Each Layout
Grout colour is one of the most underestimated decisions in a subway tile installation. The same tile with different grout produces two completely different outcomes, and once it’s set, changing it is a significant job.
The choice comes down to whether you want the pattern to be visible or invisible.
Contrasting Grout – Defining the Pattern
Dark grout against white or light tiles makes every joint visible and turns the layout pattern into an explicit design feature. Charcoal, dark grey, and black grout are the most common choices for this approach.
It’s a strong look that suits contemporary and industrial-influenced bathrooms. The herringbone and stacked layouts benefit most from contrasting grout because the pattern geometry becomes the visual statement.
The maintenance consideration is real: dark grout shows soap scum and mineral deposits more readily than light grout. Epoxy grout is worth considering here; it’s more resistant to staining and doesn’t require sealing.
Matching Grout – Seamless and Minimal
White or off-white grout against white subway tiles creates a near-seamless surface where the joints recede, and the tile reads as a continuous plane. The pattern is still there, but it’s subtle.
This approach suits bathrooms where the goal is calm, clean, and uncluttered. It’s also more forgiving to maintaining light grout on light tiles doesn’t show everyday marks the way dark grout does.
The trade-off is that matching grout can show yellowing over time in high-moisture areas, particularly around the shower. A quality epoxy or stain-resistant grout addresses this.
Subway Tile Sizes and How They Change the Look
The standard subway tile format is well established, but the market now offers a wide range of sizes, and the size you choose changes the scale, proportion, and feel of the finished wall significantly.
Standard 75 x 150mm – The Timeless Benchmark
The 75 x 150mm tile is the original subway tile format, derived from the tiles used in New York City subway stations in the early 1900s. It’s the size most people picture, and it remains the most widely used format in Australian bathrooms.
At this size, the tile reads as fine-grained and detailed. It suits smaller bathrooms well because the scale doesn’t overwhelm the space, and it works equally well in larger rooms where the pattern creates texture across a broad wall area.
It’s also the most readily available format, which keeps material costs competitive.
Larger Formats (100 x 200mm and Beyond)
Scaling up to 100 x 200mm or larger reduces the number of grout lines across the wall and creates a cleaner, more open surface. The tile reads as more substantial, and the overall effect is contemporary rather than traditional.
Larger formats suit bathrooms with higher ceilings and more generous floor areas, where the scale of the tile is proportionate to the space. In a small bathroom, a large format can feel heavy.
The installation cost for larger tiles is generally similar to standard formats the difference is in the material price, which increases with size.
Elongated Subway Tiles – A Modern Shift
Elongated subway tile formats like 75 x 300mm or 100 x 400mm push the horizontal emphasis of the standard tile much further. The result is a distinctly modern look that reads as architectural rather than traditional.
These formats work particularly well in the vertical stack layout, where the length of the tile creates strong, continuous vertical lines. They also suit the running bond layout in larger bathrooms where the elongated proportion adds visual interest without feeling busy.
Elongated tiles are increasingly popular in Sydney bathroom renovations as homeowners move toward a more contemporary aesthetic.

Design Ideas for Subway Tiles in Sydney Bathrooms
Understanding the patterns and sizes is the technical foundation. Applying them well in a real bathroom is where the design thinking happens.
These are the approaches I see working consistently in Sydney renovations.
Feature Walls and Niche Highlights
Using a different layout pattern or grout colour on a single wall, typically the shower wall or the wall behind the vanity, creates a focal point without overwhelming the room. The rest of the bathroom can use a simpler layout, and the feature wall does the design work.
Shower niches are another opportunity. Tiling the interior of a niche in herringbone while the surrounding wall uses running bond creates a deliberate contrast that looks intentional and considered.
This approach also manages cost: a more complex layout on one wall is more affordable than applying it across the entire bathroom.
Full-Room Coverage vs. Half-Wall Applications
Full-height subway tiling from floor to ceiling creates a cohesive, immersive look that reads as high-end and considered. It’s the approach I’d recommend for bathrooms where the renovation budget allows for it.
Half-wall or dado-height tiling, typically to 1,200mm or 1,500mm, is a practical alternative that reduces material and labour costs while still delivering the subway tile aesthetic. Above the tile line, a quality paint finish or a complementary wall treatment completes the space.
The choice between full and half coverage often comes down to bathroom renovation budget rather than design preference.
Combining Subway Tiles with Other Materials
Subway tiles pair well with a range of other materials, and mixing them thoughtfully adds depth and character to a bathroom. Terrazzo floor tiles with white subway walls is a combination that works consistently well; the pattern of the terrazzo contrasts with the clean lines of the subway tile without competing.
Natural stone accents a stone shelf, a stone-look floor tile, or a stone feature panel add warmth and texture that glazed ceramic alone doesn’t provide. Timber-look elements in vanity cabinetry or shelving also complement subway tiles effectively.
The key is keeping the palette restrained. Two or three materials, well chosen, produce a better result than five materials fighting for attention.
Common Mistakes to Avoid When Laying Subway Tiles
The most common problems I see in subway tile installations aren’t about the tile itself; they’re about decisions made before the first tile goes up.
Ignoring Layout Direction Relative to Room Shape
The direction of the layout pattern should respond to the shape of the room. A horizontal running bond in a narrow bathroom emphasises the width, which is usually what you want. A vertical stack in the same room would make it feel narrower.
Before committing to a layout, consider what the room needs visually. A long, narrow bathroom benefits from horizontal emphasis. A bathroom with low ceilings benefits from vertical emphasis. The tile pattern is one of the most cost-effective tools available for correcting proportion.
Getting this wrong is an expensive mistake, not because the tiles fail, but because you’ll want to change them.
Underestimating Grout Joint Width
Grout joint width affects the finished look more than most people expect. A 2mm joint produces a tight, refined finish. A 3mm joint is more forgiving of minor tile size variations and reads as slightly more relaxed.
Handmade or textured subway tiles often require a wider joint, 3mm to 5mm, because the tile edges aren’t perfectly uniform. Rectified tiles can go tighter.
Discussing joint width with your tiler before installation starts is worth the conversation. It’s a small decision with a visible outcome.
What Subway Tile Work Costs in Sydney
Subway tile installation in Sydney sits within the broader bathroom tiling cost range, and understanding the components helps you budget accurately.
Labour and Material Allowances to Budget For
Tiler day rates in Sydney typically range from $450 to $650 per day depending on experience and the complexity of the work. A standard bathroom wall tiling job, say, 15 to 20 square metres, generally takes two to three days for a competent tiler working alone.
Subway tiles themselves range from around $30 to $80 per square metre for ceramic options, with premium porcelain and handmade formats reaching $120 or more. Add adhesive, grout, waterproofing membrane, and tile trim, and the materials budget for a typical Sydney bathroom sits between $800 and $2,000 depending on tile selection and room size.
For a full supply-and-install price, most Sydney homeowners budget between $2,500 and $5,500 for subway tile wall work in a standard bathroom. Complex layouts like herringbone or diagonal add to the labour component; expect 20–30% more for these patterns compared to a standard running bond.
Conclusion
Subway tiles earn their place in bathrooms because they’re genuinely versatile: the layout pattern, grout colour, and tile size do the design work, and the same tile can read as heritage, contemporary, or minimal depending on how it’s applied.
The pattern decision is the most important one. Running bond is reliable and timeless. Herringbone and vertical stack create stronger visual statements. Grout colour determines whether the pattern reads loudly or quietly.
At Sydney Home Renovation, we help homeowners and investors get these decisions right before a single tile goes up. Reach out to us to talk through your bathroom layout and get a clear, honest cost picture for your project.
Frequently Asked Questions
What is the most popular subway tile layout for bathrooms?
Running bond, the 50% brick offset, is the most widely used subway tile layout in Australian bathrooms. It’s versatile, timeless, and suits both traditional and contemporary bathroom styles without dating quickly.
Can subway tiles make a small bathroom look bigger?
Yes. A horizontal running bond layout emphasises width, which makes a narrow bathroom feel broader. A vertical stack layout draws the eye upward and creates the impression of height in bathrooms with lower ceilings.
What grout colour works best with white subway tiles?
It depends on the look you’re after. White or off-white grout creates a seamless, minimal finish. Charcoal or dark grey grout makes the layout pattern visible and suits a more contemporary or industrial aesthetic.
How much do subway tiles cost to install in Sydney?
Supply-and-install pricing for subway tile wall work in a standard Sydney bathroom typically ranges from $2,500 to $5,500. The final figure depends on room size, tile selection, layout complexity, and whether waterproofing is included.
Are herringbone subway tiles harder to install?
Yes. Herringbone requires more precise setting out, more cuts, and more time than a standard running bond or stacked layout. This adds to the labour cost, typically 20–30% more than a straight layout for the same area.
What size subway tile is best for a bathroom?
The standard 75 x 150mm format suits most bathrooms and is the most widely available. Larger formats like 100 x 200mm suit bigger bathrooms with higher ceilings. Elongated formats like 75 x 300mm create a more contemporary look and work well in vertical stack layouts.
Do subway tiles go out of style?
Subway tiles have been used in bathrooms for over a century and show no sign of falling out of favour. The format is flexible enough to suit changing design trends; the layout pattern and grout colour update the look without changing the tile itself.


