
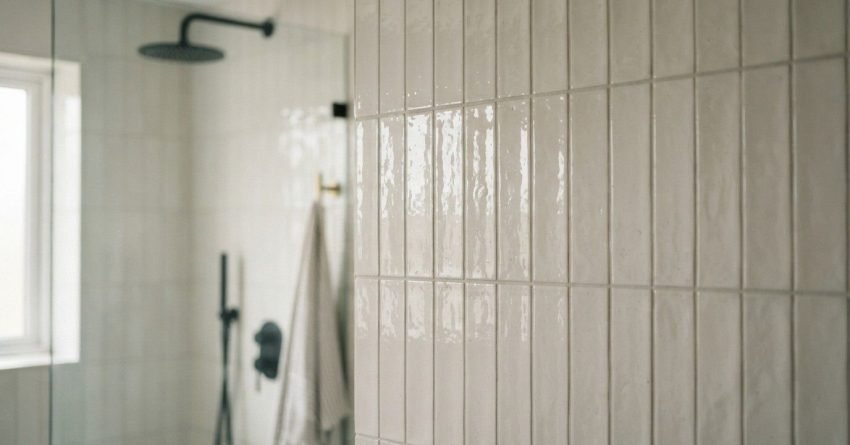
The tile pattern you choose for your shower does more than fill wall space; it sets the entire visual tone of your bathroom renovation. I’ve seen homeowners spend weeks agonising over vanity selections, then pick a tile layout in five minutes and regret it for years.
Getting this decision right saves you money, avoids costly re-dos, and gives you a result that still looks sharp a decade from now. This guide covers the patterns, formats, and combinations that actually work in real Sydney bathrooms.
We walk through classic layouts, modern large-format options, feature tile moments, colour combinations, and the budget realities behind each choice.
Classic Subway Tile Patterns That Still Work
Subway tile has been a bathroom staple for over a century, and it earns that status every time. The format is simple: a rectangular tile, typically in a 75×150mm or 100×200mm size, but the pattern you choose with it changes everything about how the finished shower reads.
It is one of the most forgiving tile choices for a first-time renovator. The material is widely available, the cost is manageable, and the installation is straightforward for an experienced tiler.
Straight Stack vs. Offset (Brick) Lay
A straight stack lays each tile directly above the one below, creating clean vertical and horizontal grout lines. It reads as modern and structured, and it suits showers with strong geometric fixtures.
The offset or brick lay staggers each row by half a tile width. This is the traditional subway pattern, and it softens the overall look while hiding minor wall imperfections better than a straight stack. For most Sydney bathrooms, the offset lay is the safer and more timeless choice.
Vertical Subway for Height and Drama
Rotating a subway tile to run vertically stacked or offset adds immediate height to a shower enclosure. I recommend this layout for bathrooms with standard 2.4m ceiling heights where the space feels compressed.
It also works well as a feature wall treatment behind a shower niche or behind a freestanding shower head. The vertical line draws the eye upward and makes the whole room feel taller without changing a single structural element.
Large-Format Tiles and Minimal Grout Lines
Large-format tiles have become the dominant choice in contemporary Sydney bathroom renovations, and the reason is straightforward. Fewer grout lines mean a cleaner visual surface, easier maintenance, and a more seamless look that reads as premium even at mid-range price points.
The trade-off is installation complexity. Large tiles require a flatter substrate, more precise waterproofing, and a tiler with specific experience handling oversized formats.
600×600 and 600×1200 Formats in Showers
The 600×600mm tile is the current standard for shower floors and walls in mid-to-upper renovations across Sydney. The 600×1200mm format, sometimes called a plank tile, is increasingly popular for feature walls and full-height shower surrounds.
Both formats work well in showers of 900mm width or larger. In a compact 900×900mm shower, a 600×1200mm wall tile can feel proportionally heavy, so I usually recommend the 600×600mm as the safer call in tighter spaces.
Why Large Format Changes the Feel of a Small Shower
This is one of the most consistent results I see on site. A small shower tiled in 100×200mm subway tiles reads as busy and enclosed. The same shower tiled in 600×600mm reads as open and considered.
The fewer grout lines there are, the less visual interruption the eye encounters. That reduction in visual noise is what makes a compact shower feel larger, not the tile itself, but the reduction in pattern repetition across the surface.
Mosaic and Feature Tile Patterns
Mosaics and feature tiles serve a different purpose than field tiles. They are not meant to cover the whole shower; they are meant to create a moment within it. Used well, a single mosaic panel or feature strip elevates an otherwise simple tile selection into something that looks considered and designed.
Used poorly, they compete with everything else in the room and make the space feel cluttered.
Penny Round and Hexagon Mosaics
Penny round tiles, small circular mosaics typically 25–50mm in diameter, work particularly well on shower floors. Their curved edges and tight grout joints provide natural slip resistance, and the pattern adds visual texture without overwhelming the wall tiles above.
Hexagon mosaics follow the same logic. The geometric shape reads as contemporary, and the format is available in everything from white gloss to matte charcoal to terracotta. I find the 48mm hexagon the most versatile size for Sydney shower floors, large enough to read clearly, small enough to navigate drainage falls without awkward cuts.
Using a Feature Strip or Niche as a Pattern Moment
A shower niche is one of the best places to introduce a contrasting tile without committing to it across the whole shower. Tiling the niche interior in a mosaic, a bold colour, or a textured tile creates a deliberate design moment that frames the recess and adds depth.
A feature strip a single horizontal band of contrasting tile running across the shower wall is a more traditional approach. It works best when it aligns with a functional element like the top of a niche or the height of a shower head outlet. Random placement reads as an afterthought.
Herringbone and Chevron Tile Layouts
Herringbone and chevron are the two pattern layouts that generate the most questions from homeowners I work with. Both use rectangular tiles arranged at angles, and both create a strong directional visual. The difference between them is subtle but matters for the finished result.
These patterns add labour cost and require a more experienced tiler to execute cleanly. That cost is worth it when the pattern is the right choice for the space and not worth it when it is chosen purely because it looks good in a showroom display.
Where Herringbone Works Best in a Shower
Herringbone works best as a feature wall treatment rather than a full-shower layout. A single herringbone wall behind the shower head, paired with a simple large-format tile on the remaining three walls, creates strong visual contrast without the pattern becoming overwhelming.
It also suits shower floors in smaller formats; a 75×150mm tile in herringbone on a shower floor reads as intentional and detailed. The pattern naturally draws the eye downward, which can help anchor a shower that has a lot of visual activity on the walls.
Chevron vs. Herringbone: The Practical Difference
In a herringbone layout, rectangular tiles meet at 90-degree angles, with each tile’s end touching the side of the next. In a chevron layout, the tiles are cut at an angle so their ends meet in a perfect point, creating a continuous V or arrow shape.
Chevron requires purpose-cut tiles, which increases both material waste and cost. Herringbone uses standard rectangular tiles with no special cuts at the field. For most residential shower renovations in Sydney, herringbone delivers a similar visual result at a lower cost and with less installation complexity.

Textured and 3D Tile Surfaces
Texture in a shower tile does two things simultaneously. It adds a tactile and visual dimension that flat tiles cannot replicate, and it provides grip underfoot or on wet surfaces. The challenge is choosing a texture that is genuinely functional rather than one that looks interesting in a showroom but becomes a cleaning problem on site.
I always ask clients to think about maintenance before committing to a heavily textured tile. A beautiful deeply grooved surface that traps soap scum is a frustration every single day.
Fluted and Ribbed Tile Profiles
Fluted tiles featuring parallel vertical channels across the tile face have moved from a niche architectural product to a mainstream bathroom choice over the past three years. They work particularly well as a full-height feature wall in a shower, where the vertical channels reinforce the sense of height.
Ribbed profiles follow the same principle with a finer, more repetitive groove pattern. Both formats are available in ceramic, porcelain, and natural stone looks. I recommend a matte or satin finish over gloss for fluted tiles in showers; the gloss finish amplifies every water mark and fingerprint on the raised surfaces.
Stone-Look and Concrete-Look Textures
Porcelain tiles that replicate the look of natural stone or raw concrete have become the dominant mid-range choice in Sydney bathroom renovations. They deliver the aesthetic of premium materials at a fraction of the cost, with better durability and lower maintenance than the real thing.
The best stone-look porcelains now replicate the veining, tonal variation, and surface texture of travertine, marble, and limestone convincingly enough that the difference is not obvious at a glance. Concrete-look tiles in large formats, particularly in warm grey and taupe tones, suit the contemporary industrial aesthetic that remains popular across inner-city Sydney renovations.
Colour and Tone Combinations That Work
Colour is where most renovation decisions either come together or fall apart. The tile pattern can be perfect, the format can be right, and the layout can be well-executed, but if the colour combination is off, the whole shower reads as unresolved.
The safest approach is to anchor the shower in a neutral field tile and introduce colour through a single feature element. That single point of colour does more visual work than a whole wall of it.
Neutral Palettes: White, Grey, and Warm Beige
White remains the most popular shower tile colour in Sydney for a reason. It reflects light, reads as clean, and works with every fixture finish from chrome to brushed brass to matte black. The risk with white is that it shows grout discolouration over time a light grey grout rather than bright white grout manages this better in practice.
Warm beige and greige tones have grown significantly in popularity over the past two years. They suit the warmer fixture finishes brushed gold, aged brass, and brushed nickel, and they age better than stark white in bathrooms with natural light variation throughout the day.
Bold Accents: Navy, Forest Green, and Charcoal
Deep navy, forest green, and charcoal are the three bold tile colours I see working consistently well in Sydney bathroom renovations. They suit full-height feature walls in showers, particularly when paired with a white or light grey field tile on the remaining walls.
The key with bold colour in a shower is commitment. A half-hearted application of one small panel of navy in an otherwise all-white shower reads as tentative. A full feature wall in a deep tone, executed with confidence and paired with the right fixture finish, reads as deliberate and considered.
Mixing Tile Sizes and Patterns in One Shower
Mixing tiles is one of the most effective ways to add design depth to a shower renovation. It is also one of the easiest ways to create a result that looks busy, unresolved, and visually exhausting. The difference between the two outcomes comes down to one principle: contrast, not competition.
Two tiles that are too similar in size, pattern, or tone fight each other. Two tiles that are clearly different in size, texture, or format complement each other.
The Rule of Contrast: Large Field + Small Feature
The most reliable mixing formula is a large-format field tile paired with a small-format feature tile. A 600×600mm field tile on three walls paired with a 48mm hexagon mosaic on the floor is a combination that works in almost every shower configuration.
The size contrast is clear enough that neither tile competes with the other. The field tile provides the calm, uninterrupted surface that makes the shower feel spacious. The mosaic provides the detail and texture that makes it feel considered.
Common Mistakes When Mixing Patterns
The most common mistake I see is mixing two patterned tiles of similar scale. A herringbone wall tile paired with a penny round floor tile in similar sizes creates visual noise rather than visual interest. The patterns compete at the same frequency, and neither one reads clearly.
The second most common mistake is mixing too many colours across the tile selection. Two tiles, two tones. That is the rule I give every client who wants to mix patterns. More than two distinct colour tones across a shower tile selection almost always reads as chaotic rather than designed.
Tile Layout Direction and Its Visual Effect
The direction a tile is laid has a measurable effect on how a space reads. This is one of the most underused design tools in residential bathroom renovation and one of the cheapest, since changing the lay direction costs nothing in materials and very little in additional labour.
Every shower has a dominant dimension; either it is wider than it is tall, or taller than it is wide. The tile layout direction should work with that dimension, not against it.
Horizontal Lays That Widen a Shower
A horizontal tile lay where the long edge of the tile runs parallel to the floor draws the eye across the width of the shower. This is the right choice for a shower that feels narrow or compressed in its width.
It works particularly well with subway tiles and plank-format tiles. A 100×300mm tile laid horizontally across a 900mm wide shower wall creates a strong sense of width that the same tile laid vertically does not.
Vertical and Diagonal Lays That Add Height
A vertical lay draws the eye upward and adds perceived ceiling height. It is the right choice for a shower in a bathroom with a standard 2.4m ceiling where the space feels low.
A diagonal or 45-degree lay is the most labour-intensive option and adds the most visual energy. It works best in larger shower enclosures where the pattern has room to read clearly. In a compact shower, a diagonal lay can feel busy and disorienting rather than dynamic.
Budget Considerations for Shower Tile Choices
Tile selection is one of the most significant cost variables in a bathroom renovation budget. The range between entry-level and premium tile products is wide, and the pattern complexity you choose directly affects the labour cost on top of the material cost.
Understanding both sides of this equation material cost and installation cost is essential for setting a realistic shower tile budget before you commit to a design direction.
Entry-Level vs. Mid-Range vs. Premium Tile Costs
Entry-level ceramic tiles for shower walls typically range from $20 to $45 per square metre in Sydney. Mid-range porcelain tiles, including most large-format and stone-look options, sit between $55 and $120 per square metre. Premium tiles, including genuine natural stone, designer porcelain, and imported European formats, run from $150 per square metre upward with no firm ceiling.
These are supply costs only. Installation adds a separate labour component that varies by pattern complexity, substrate condition, and the tiler’s experience level. A bathroom tiling cost breakdown gives you the full picture of what to expect across both supply and labour.
How Pattern Complexity Affects Labour Cost
A straight stack or offset subway tile is the baseline for tiling labour. Herringbone and chevron layouts typically add 20 to 35 percent to the tiling labour cost because of the additional cuts, the more precise layout work, and the slower installation pace required to keep the pattern true.
Mosaic tiles on floors add labour time because of the smaller format, the more complex grouting process, and the additional care required around drainage falls. Large-format tiles add labour cost through the substrate preparation requirements and the additional handling time per tile. Pattern complexity is never free, and understanding that cost upfront prevents budget surprises mid-renovation.
Frequently Asked Questions
What is the most popular shower tile pattern in Australia right now?
Large-format porcelain tiles in a straight or offset lay are the dominant choice across Sydney bathroom renovations at the moment. Herringbone remains popular as a feature wall treatment, and fluted tiles have grown significantly in demand over the past two to three years.
Do herringbone tiles cost more to install than straight-lay tiles?
Yes, herringbone installation typically costs 20 to 35 percent more in labour than a standard straight or offset lay. The additional cost comes from the more complex layout, the higher number of cuts required, and the slower installation pace needed to keep the pattern accurate.
What tile size makes a small shower look bigger?
Large-format tiles, particularly 600×600mm or 600×1200mm, make a small shower feel more open by reducing the number of grout lines across the surface. Fewer grout lines mean less visual interruption, which reads as more space even when the physical dimensions have not changed.
Can I mix different tile patterns in the same shower?
Yes, and it works well when the two tiles are clearly different in scale. A large-format field tile paired with a small mosaic floor tile is the most reliable combination. Avoid mixing two patterned tiles of similar size; they compete rather than complement.
How much should I budget for shower tiles in a Sydney bathroom renovation?
Material costs for shower tiles in Sydney range from around $20 per square metre for entry-level ceramic to $150 or more per square metre for premium porcelain or natural stone. Installation labour adds a separate cost that varies by pattern complexity, substrate condition, and the size of the shower enclosure.
Conclusion
Shower tile ideas and patterns cover a wide range of formats, layouts, and combinations from classic subway offset lays to large-format porcelain, herringbone feature walls, and textured fluted profiles. The right choice depends on the shower dimensions, the renovation budget, and the visual outcome you are working toward.
Pattern direction, tile scale, and colour tone all shape how a finished shower reads, and getting those three elements working together is what separates a result that looks considered from one that looks assembled.
At Sydney Home Renovation, we help homeowners and property investors make these decisions with confidence from tile selection and pattern planning through to full installation and project delivery. Reach out to our team to start planning your bathroom renovation today.


