
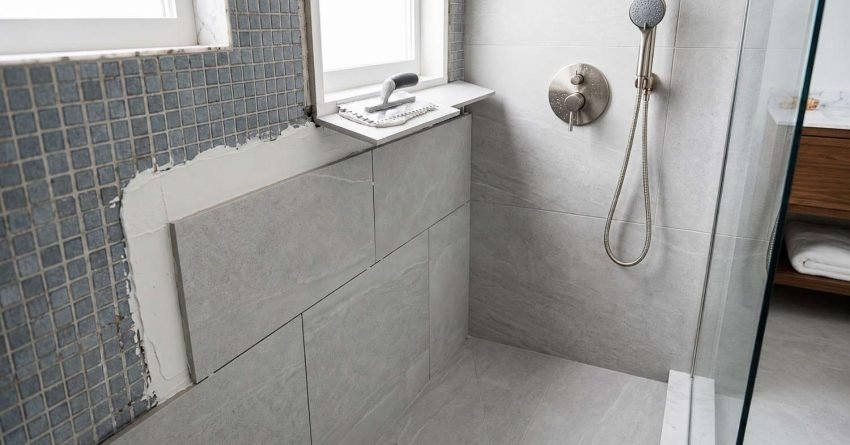
Yes, renovating a shower without removing tiles is genuinely possible, and in Sydney, it’s a method we use regularly for homeowners who want a fresh result without the cost and disruption of a full strip-out. The approach works by overlaying new materials directly over existing tiles, provided the underlying structure meets a few key conditions. It’s not a shortcut. It’s a legitimate renovation method with real results.
Tile removal is one of the most labour-intensive and expensive parts of any bathroom renovation. Skipping it can save thousands of dollars and cut days off your project timeline.
In this article, I’ll walk through exactly how the no-tile-removal method works, when it’s the right call, what it costs in Sydney, and what the finished result actually looks like.
What “Renovating Without Removing Tiles” Actually Means
This isn’t about painting over old tiles or applying a peel-and-stick film. It’s a structural renovation approach that installs new surface materials directly over your existing tiled walls and floor, creating a completely new shower interior without touching the original substrate.
The result looks and functions like a brand-new shower. The difference is in what happens behind the scenes.
The Core Methods Available in Sydney
Three main methods make this possible:
Tile-over-tile installation lays new tiles directly over the existing surface using a high-bond adhesive. It adds a small amount of depth to the walls and floor, which needs to be factored into fitting dimensions.
Acrylic or PVC panel overlay installs rigid wall panels over the existing tiles. These panels are cut to size, bonded to the surface, and sealed at the joins. They’re fast to install, grout-free, and available in a wide range of finishes.
Shower resurfacing applies a specialist coating system directly to the existing tiles, changing the colour and texture without adding significant depth. It’s the most surface-level of the three options and suits specific situations.
Each method suits different tile conditions, budgets, and aesthetic goals. We assess which one fits your shower before recommending anything.
What Stays, What Changes, and What Gets Covered
Your existing tiles stay in place. The grout lines, the substrate behind the tiles, and the original waterproofing membrane all remain untouched, which is both the advantage and the constraint of this method.
What changes is everything the eye sees: the wall surface, the floor finish, the shower screen, the tapware, and the fixtures. A shower renovation without tile removal can include a full fitting upgrade: new showerhead, new mixer, new screen, while leaving the tile structure completely intact.
The keyword here is “covered.” The old tiles are encapsulated, not removed. That means any existing problems beneath the surface stay beneath the surface unless they’re identified and addressed before the overlay goes on.
When This Approach Works and When It Doesn’t
The no-tile-removal method is not universally applicable. It works well in the right conditions and fails badly in the wrong ones. Getting this assessment right is the most important step in the whole process.
Conditions That Make It Viable
The overlay method works when:
- The existing tiles are firmly bonded to the wall with no hollow spots, cracks, or movement
- There is no active water leak or evidence of water penetration behind the tiles
- The substrate, the wall or floor structure behind the tiles, is sound and dry
- The existing waterproofing membrane is intact and performing correctly
- The shower floor has adequate fall toward the drain and no pooling issues
- The overall tile surface is reasonably flat, with no major lippage between tiles
When all of these conditions are present, overlaying is a clean, cost-effective solution. We check every one of these points during our initial site assessment.
Situations Where Tile Removal Is Unavoidable
There are situations where we will always recommend a full strip-out, regardless of what the client prefers. Overlaying over a compromised substrate creates a bigger problem down the track and a more expensive one.
Tile removal becomes necessary when:
- There is visible mould penetration behind the tiles or into the wall cavity
- The waterproofing membrane has failed, evidenced by damp walls, efflorescence, or soft spots
- Tiles are hollow, cracked, or lifting, indicating adhesive failure or substrate movement
- The shower floor has a drainage problem that requires re-grading
- The existing tile surface is too uneven for a flat overlay installation
I’ve seen homeowners push ahead with an overlay on a compromised shower and regret it within 18 months. The overlay hides the problem. It doesn’t fix it. When the substrate is the issue, the substrate has to be addressed, and that means the tiles come off.
The Real Costs Compared: Overlay vs. Full Strip-Out
Cost is usually the primary reason homeowners explore the no-tile-removal option. And the savings are real, but they’re not unlimited, and they don’t apply to every line item in the budget.
Typical Cost Range for Overlay Renovation in Sydney
A shower renovation using the overlay method in Sydney typically costs between $2,500 and $6,000, depending on the size of the shower, the materials selected, and the scope of fitting replacements included.
A full strip-out shower renovation covering the same scope, same size, same fittings typically runs between $5,000 and $12,000 or more, with the higher end reflecting complex waterproofing repairs, structural work, or premium tiling.
The overlay method delivers a genuine cost reduction. The gap narrows when the overlay materials are premium or when significant fitting work is involved.
Where the Savings Come From and Where They Don’t
The savings in an overlay renovation come almost entirely from labour. Tile removal is slow, physical work. A standard shower strip-out can take one to two days of labour before any new material goes on. Skipping that step removes a significant chunk of the project cost.
Disposal costs also drop. Removed tiles generate substantial waste that requires skip bin hire and disposal fees. With an overlay, that cost disappears.
Where the savings don’t apply: fittings, fixtures, and waterproofing. A new showerhead, mixer, screen, and drain cover cost the same regardless of the renovation method. And if any waterproofing work is required, even minor sealing at joins and penetrations, that cost is present in both approaches.
The honest summary: the overlay method saves on demolition and disposal. Everything else is priced on its own merits.
What the Finished Result Looks Like
One of the most common concerns I hear is whether an overlay renovation looks “as good” as a full retile. The answer depends on the materials chosen, but done well, the result is indistinguishable from a brand-new shower.
Aesthetic Outcomes and Material Options
Acrylic and PVC wall panels are the most popular choice for overlay renovations in Sydney. They’re available in stone-look, marble-look, and solid colour finishes, with matte and gloss options. The surface is seamless no grout lines, no joins visible on the face of the panel which gives the shower a clean, contemporary look that many homeowners actually prefer over traditional tiling.
Tile-over-tile installations look exactly like a tiled shower, because they are one. The finish quality depends entirely on the tile selected and the standard of the installation.
Resurfaced showers have a more uniform, painted appearance. They suit functional upgrades where the goal is a colour refresh rather than a full aesthetic transformation.
Durability and Long-Term Performance Expectations
Quality acrylic and solid-surface panels installed correctly carry manufacturer warranties of 10 to 25 years. They’re resistant to mould, easy to clean, and don’t require regrouting. The surface holds up well in daily use.
Tile-over-tile installations perform as well as any tiled shower, provided the adhesive bond is correct and the substrate was sound at the time of installation.
The weakest link in any overlay renovation is the seal at penetrations around the drain, tapware, and screen frame. These need to be done properly and checked periodically. A failed seal at a penetration point is the most common cause of water ingress in overlay showers, and it’s entirely preventable with correct installation.
How to Get Started With a No-Tile-Removal Shower Renovation
The first step is an honest assessment of your existing shower. Not every shower suits this method, and finding that out early saves time, money, and frustration.
Steps to Assess, Plan, and Engage a Contractor
Step 1: Initial inspection. A qualified contractor inspects the existing tiles, checks for hollow spots, examines the grout and silicone condition, and looks for any signs of water damage or membrane failure. This is a non-negotiable first step.
Step 2: Scope definition. Once the shower is confirmed as suitable, the scope is defined: which method, which materials, which fittings, and what the finished result will look like. A detailed quote follows.
Step 3: Material selection. You choose your panels, tiles, or resurfacing finish, along with any new fittings. We provide samples and guide you through options that suit your bathroom’s existing style and your budget.
Step 4: Installation. A no-tile-removal shower renovation typically takes one to three days on-site, depending on scope. There’s no demolition phase, so the project moves quickly from day one.
At Sydney Home Renovation, we handle every step of this process from the initial assessment through to the finished installation. If your shower suits the overlay method, we’ll tell you clearly. If it doesn’t, we’ll tell you that too, and explain exactly why.
Conclusion
Renovating a shower without removing tiles is a practical, cost-effective option for the right shower in the right condition. The method saves real money on labour and disposal, delivers a genuinely finished result, and completes faster than a full strip-out.
The condition of your existing tiles and substrate determines whether it’s the right call. That assessment has to come first.
We’re ready to take a look at your shower and give you a straight answer. Contact Sydney Home Renovation for an obligation-free site assessment and quote.
Frequently Asked Questions
Is renovating a shower without removing tiles legal in Sydney?
Yes. Overlay renovation methods are fully compliant with Australian building standards when installed correctly by a licensed contractor. Waterproofing requirements at joins and penetrations still apply and must be met regardless of the method used.
How long does a no-tile-removal shower renovation take?
Most overlay shower renovations in Sydney take one to three days on-site. There’s no demolition phase, which removes the longest part of a traditional renovation timeline. Complex fitting replacements or larger showers may extend this slightly.
Will the overlay method work on my existing tiles?
It depends on the condition of your tiles. They need to be firmly bonded, flat, and free of hollow spots, cracks, or movement. We assess this during the initial inspection before recommending any overlay approach.
Does this approach affect waterproofing?
The existing waterproofing membrane stays in place and is not disturbed. New sealing is applied at all joins, penetrations, and screen frames as part of the installation. The overlay method does not compromise waterproofing when installed correctly.
Can I add a new shower screen without removing tiles?
Yes. A new shower screen is a standard inclusion in most overlay renovations. The screen frame is fixed and sealed to the new surface, and the installation accounts for any depth added by the overlay panels or tiles.
How much does a shower renovation without tile removal cost in Sydney?
Overlay shower renovations in Sydney typically range from $2,500 to $6,000, depending on shower size, materials, and fittings. This is generally 40 to 60 percent less than a full strip-out renovation of equivalent scope.


