
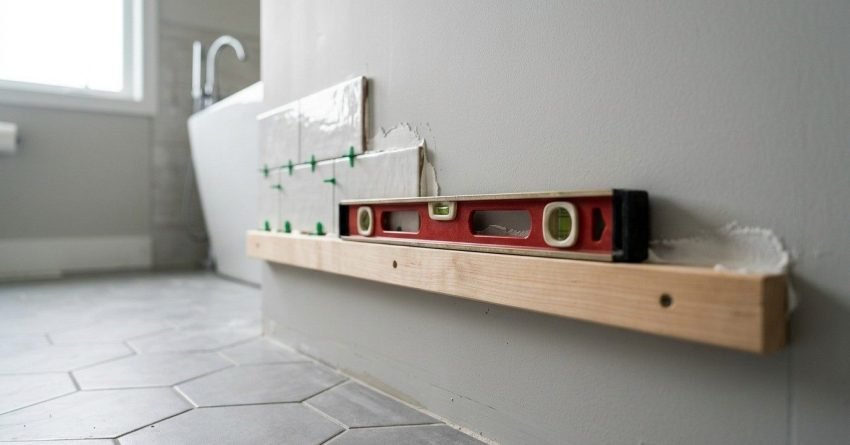
The best place to start tiling a bathroom wall is from the bottom, using a level batten board positioned one tile height above the floor. This method keeps tiles perfectly level across the entire wall, regardless of whether the floor underneath is uneven.
Getting the starting point wrong leads to crooked rows, awkward cuts, and a finish that looks amateur. We’ve seen Sydney homeowners lose entire weekends fixing a bad first row, so understanding proper tile layout upfront saves both time and money.
Why Your Starting Point Matters When Tiling Bathroom Walls
Your starting point determines the success of the entire tiling project. Begin in the wrong place, and every subsequent row compounds the error. Tiles creep out of alignment, grout lines wander, and the finished result reads as DIY.
We find that professional tilers spend more time planning their starting point than most homeowners spend on the entire layout. This preparation separates quality work from costly mistakes. It also connects to a broader sequencing decision: most Sydney bathroom renovations tile the walls before the floor, since wall tiles establish the reference lines that floor tiles then tuck under.
How Tile Layout Affects Visual Balance
Tile placement creates visual symmetry. When someone enters a bathroom, their eye naturally travels to focal points: the shower, the vanity mirror, the window. Tiles should frame these features with balanced cuts on either side.
Starting from a centred position on the focal wall ensures equal tile cuts at both edges. A 100mm sliver on one side and a full tile on the other looks unbalanced. Planning the layout first prevents this common problem.
We also account for how tiles meet at corners. Internal corners are more forgiving than external corners, where cut edges become visible. The starting point should account for where full tiles and cut tiles will land.
Structural and Waterproofing Considerations
Australian Standard AS 3740, which governs waterproofing of domestic wet areas, mandates waterproof membranes in showers, around baths, and behind vanities. Sydney’s building codes enforce these requirements in full.
The starting point must work with these waterproofed zones. Tiles need to cover membrane edges completely. Starting too high or too low can leave waterproofing exposed or create weak points where water penetrates.
Wall substrate condition also influences the starting point. Cement sheet, plasterboard, and existing tiles each require different preparation, and masonry walls generally hold fixings more securely than lightweight plasterboard. Damaged or uneven substrates need repair before any tile touches the wall.

Essential Preparation Before You Begin Tiling
We treat preparation as roughly 70% of a successful tiling job. Rushing this stage guarantees problems later. Tiles don’t hide wall defects; they highlight them.
Assessing Your Bathroom Wall Condition
Run a straight edge across the walls. Gaps larger than 3mm over a 2-metre span need correction, since hollow spots, bulges, and uneven surfaces create lippage between tiles and weak adhesive bonds.
Check for moisture damage. Soft spots in plasterboard indicate water penetration, and these areas require replacement rather than patching. Tiling over damaged substrate leads to tile failure within months.
Test existing paint by scoring an X pattern and applying masking tape. If the paint lifts when the tape comes off, the surface needs sanding or complete removal, since tiles won’t bond to flaking paint.
Gathering Tools and Materials
Quality tools make the difference between frustration and efficiency. Essential items include:
Layout and Measuring:
- 1200mm spirit level (minimum)
- Laser level for large areas
- Tape measure and pencil
- Tile spacers (3mm standard for walls)
- Chalk line
Installation:
- Notched trowel (6mm or 10mm depending on tile size)
- Rubber grout float
- Tile cutter or wet saw
- Tile nippers for curves
- Sponge and buckets
Materials:
- Tiles (order 10–15% extra for cuts and breakage)
- Flexible tile adhesive (for wet areas)
- Waterproof grout
- Silicone sealant for corners and junctions
Cheap tools cost more in wasted time and materials. A quality tile cutter pays for itself on the first project.
Waterproofing Requirements for Sydney Bathrooms
NSW Fair Trading requires licensed waterproofers for shower recesses and wet areas. DIY waterproofing voids warranties and creates liability issues if water damage occurs.
Waterproof membranes must extend:
- 1800mm minimum above shower floor
- 150mm beyond shower screen edges
- Full height behind baths
- 100mm above vanity splashback areas
Tiles must completely cover membrane edges, since exposed membrane deteriorates under UV light and cleaning chemicals. We plan the starting point to guarantee full coverage.
Allow waterproofing to cure completely before tiling. Most membranes require 24–72 hours depending on product and conditions, and tiling over uncured membrane causes adhesion failure.
The Best Starting Point for Bathroom Wall Tiles
Three main approaches work for bathroom wall tiling. The right choice depends on wall layout, tile size, and focal points within the space.
Starting from the Bottom Row (Batten Method)
The batten method remains the professional standard for most bathroom walls. We install a temporary horizontal support one tile height above the floor, creating a perfectly level starting line.
Why this works:
Bathroom floors are rarely level. Starting directly from the floor transfers every undulation into the tile rows, and by the time the rows reach eye level, tiles have drifted noticeably off-horizontal.
The batten creates an independent level reference. The first row sits perfectly straight, and subsequent rows stack evenly above it. Once the adhesive cures, we remove the batten and fill the bottom row, cutting tiles to match the floor profile.
Batten installation steps:
- Measure one full tile height plus 3mm (for the grout line) up from the lowest floor point
- Mark this height at both wall ends
- Snap a chalk line between marks
- Verify with a spirit level and adjust as needed
- Screw a straight timber batten along the line
- Double-check level before tiling
We use a straight piece of 50x25mm timber or aluminium angle. Warped battens defeat the purpose entirely.
Choosing a Starting Point Based on Tile Size
Tile size directly shapes where a starting point makes sense. Small format tiles (under 200mm) forgive minor layout adjustments, so starting from the bottom batten works reliably in almost every room.
Large format tiles (600x600mm and above) leave far less room for error, since a single miscalculated row can throw off proportions across the whole wall. With these tiles, we dry-lay a full column vertically before committing to a starting height, checking how the top row lands relative to the ceiling line or bulkhead.
Working from a Focal Point or Feature Wall
Feature walls and shower niches benefit from centre-out tiling. This approach places full tiles at the visual centre, with equal cuts at both edges.
When to use this method:
- Accent walls with contrasting tiles
- Walls with centred features (windows, niches)
- Large-format tiles where symmetry matters
- Patterned tiles requiring alignment
We find the wall’s centre point, then dry-lay tiles from the centre to edges using spacers. We adjust the starting position until cut tiles at both ends exceed half a tile width, since narrow slivers look awkward and are difficult to cut cleanly.
Mark the centre line vertically, then install a horizontal batten as described above. Begin tiling from the centre-bottom intersection, working outward in both directions.
Tiling Around Windows and Niches
Windows and shower niches require careful planning. Tiles should frame these features symmetrically, with cuts positioned at less visible edges.
Planning approach:
- Measure the feature’s width
- Calculate how many full tiles fit across
- Determine remaining space for cut tiles
- Adjust the starting point to balance cuts on both sides
For shower niches, we tile the back wall first, then side walls, then the top. This sequence hides cut edges in corners. Matching tile trim or mitred edges finish external corners professionally.
Window reveals follow the same principle. We tile the sill first (with a slight fall toward the room), then the jambs, then the head. Bullnose tiles or aluminium trim finish exposed edges professionally.
Step-by-Step Guide to Beginning Your First Row
With preparation complete and the starting point determined, it’s time to tile. Take time with the first row, since it sets the standard for everything above.
Measuring and Marking Your Layout Lines
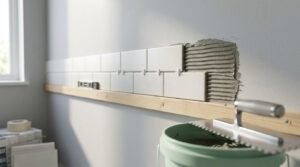
Dry-lay the bottom row along the batten without adhesive, including spacers between each tile. This reveals exactly where cuts fall and confirms the layout works.
Mark tile positions on the batten with pencil, noting which tiles need cutting and measuring cut dimensions. Prepare all cut tiles before mixing adhesive so the installation moves faster once started.
While dry-laying, we also plan the grout line width and colour, since darker grout tends to hide minor tile-size variation better than white grout on a bathroom wall. Snap a vertical plumb line at the starting point to keep tiles from drifting sideways as the work moves up the wall.
Setting Up a Level Batten or Ledger Board
The batten must be:
- Perfectly level (check multiple times)
- Firmly fixed (tiles are heavy)
- Straight (no bows or twists)
- Positioned correctly (one tile height plus grout gap above the lowest floor point)
We screw into wall studs where possible and use wall plugs in masonry. The batten supports significant weight while adhesive cures, so flimsy fixings lead to disaster.
For long walls, join batten sections carefully. Any step between sections shows in the tile line, so we run a straight edge across joints to verify alignment.
Applying Adhesive Correctly
Mix adhesive to manufacturer specifications. Too wet and tiles slide; too dry and adhesive won’t transfer properly. We aim for a thick peanut butter consistency.
Spread adhesive with the flat trowel edge first, pressing firmly into the wall surface. This “burn coat” ensures maximum contact. Then comb through with the notched edge, holding the trowel at 45 degrees consistently.
Coverage rules:
- Work in sections that can be tiled within 15–20 minutes
- Adhesive that skins over won’t bond properly
- Hot, dry conditions shorten working time
- Apply to the wall only (not tile backs) for standard installations
For large-format tiles (over 300x300mm), we back-butter the tile as well as the wall. This achieves the 95% coverage required for wet areas under AS 3958.1, the Australian standard for ceramic tile installation.
Placing Your First Tiles
Press the first tile firmly into the adhesive with a slight twisting motion. This collapses the adhesive ridges and maximises contact. Sliding tiles into position pushes adhesive up between joints, so we avoid it.
Check level immediately and adjust by tapping gently with a rubber mallet. Insert spacers at corners before placing the next tile.
We continue along the batten, checking level every two or three tiles. Small adjustments now prevent major problems later, since repositioning becomes impossible once adhesive begins setting.
Work from the starting point toward corners. This keeps cut tiles at edges where they’re less visible, and corner cuts wait until the main field is established.
Common Mistakes to Avoid When Starting Wall Tiles
Learning from others’ errors saves time, money, and frustration. These mistakes appear constantly in DIY bathroom tiling projects.
Starting Without a Level Reference
“The floor looks level enough” costs more renovations than any other assumption. Floors slope toward drains, settling creates dips, and previous tilers made compromises.
We always use a level batten, regardless of how flat the floor appears. The $20 investment in timber saves hundreds in corrections later.
Even small deviations compound dramatically. A 2mm error per row becomes 20mm over ten rows, and by ceiling height, tiles are visibly crooked to anyone entering the room.
Ignoring Tile Layout Planning
Jumping straight into tiling without dry-laying first guarantees awkward cuts. These problems only surface after adhesive has set, when solutions become expensive.
Common layout failures include:
- Tiny slivers at edges (difficult to cut, look amateur)
- Misaligned patterns across walls
- Cuts falling at focal points instead of edges
- Grout lines that don’t align with features
Spending 30 minutes planning saves hours fixing. Dry-lay tiles, photograph the layout, measure twice, and adjust starting points until cuts fall where they should.
Rushing the Adhesive Application
Working too large an area means adhesive skins over before tiles are placed. Working too small wastes time constantly mixing fresh batches. Finding the right pace takes practice.
Signs of skinned adhesive:
- Surface appears dull rather than wet
- Finger touch leaves no impression
- Adhesive doesn’t transfer to tile back
Skinned adhesive won’t bond. We scrape it off and apply fresh adhesive, since tiling over compromised adhesive creates hollow spots that crack under pressure or temperature changes.
In Sydney’s variable climate, we adjust the working area based on conditions. Hot, dry days with air movement require smaller sections, while cool, humid conditions allow more extensive coverage.
Professional Tips for a Flawless Finish
These techniques separate professional results from obvious DIY work. Small details create the polished appearance homeowners want.
Planning for Cut Tiles and Edges
Cut tiles belong at room edges, behind toilets, and below vanities, anywhere they’re less visible. We plan layouts to position full tiles at eye level and focal points.
Minimum cut width: Aim for cuts no smaller than one-third of a tile width. Narrow cuts are difficult to execute cleanly and look like afterthoughts, so we adjust the starting point to avoid slivers.
Cutting technique matters: Score-and-snap cutters work for straight cuts in ceramic tiles. Porcelain and diagonal cuts require a wet saw, and attempting difficult cuts with inadequate tools wastes tiles and time.
We measure each cut individually, since walls aren’t perfectly straight or square. A cut that fits perfectly at one end may be wrong at the other, so measure, mark, cut, and test-fit before applying adhesive.
Maintaining Consistent Grout Lines
Spacers ensure consistent joint widths, but they’re not foolproof. Tiles vary slightly in size, spacers can shift, and adhesive thickness affects positioning.
Professional approach:
- Use spacers at every junction
- Check alignment against the vertical plumb line regularly
- Stand back and view the wall from the entry point
- Adjust while adhesive remains workable
Grout lines should run straight and parallel, since wandering lines draw the eye immediately. If lines begin drifting, we stop and identify the cause before continuing.
Remove spacers before grouting. Buried spacers create weak points in grout lines, so we extract them once the adhesive has firmed but before full cure, typically 2–4 hours after placement.
Working Around Fixtures and Fittings
Bathroom walls include pipes, outlets, and mounting points. Cutting tiles to fit around these obstacles requires patience and the right tools.
For circular cuts (pipe penetrations):
- Mark the centre point on the tile
- Use a hole saw or diamond-tipped drill bit
- Cut slightly oversize to allow for movement
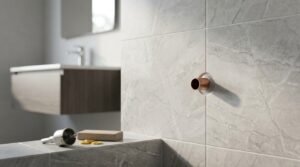
- Cover gaps with escutcheon plates
For rectangular cuts (outlets, niches):
- Mark cut lines on the tile face
- Score with a tile cutter
- Use tile nippers to remove waste
- Clean edges with a rubbing stone
We leave 3–5mm clearance around penetrations, since tiles expand and contract with temperature changes. Tight cuts against pipes crack over time, and silicone sealant fills gaps while allowing movement.
When to Call a Professional Tiler in Sydney
DIY tiling suits simple layouts with standard materials. Complex projects benefit from professional expertise, and knowing when to call for help prevents costly mistakes.
Complex Layouts and Large-Format Tiles
Large-format tiles (600x600mm and above) require specialised techniques. Their weight demands stronger adhesive bonds, their size makes handling difficult, and lippage between tiles becomes more visible.
Professional tilers use:
- Levelling systems to eliminate lippage
- Suction lifters for safe handling
- Large-notch trowels for adequate adhesive coverage
- Experience judging substrate flatness requirements
Intricate patterns, diagonal layouts, and feature designs also benefit from professional installation. The cost difference between DIY and professional work often disappears once wasted materials and time get factored in.
Waterproofing and Compliance Requirements
NSW regulations require licensed waterproofers for wet areas. DIY waterproofing isn’t just inadvisable; it’s non-compliant, and insurance claims for water damage may be rejected if unlicensed work is discovered.
We coordinate waterproofing and tiling on every bathroom project to ensure membranes meet Australian Standards, certificates get issued for compliance, tile installation doesn’t compromise waterproofing, and warranties remain valid. Managing both trades under one point of responsibility eliminates finger-pointing if problems arise later.
Conclusion
Starting your bathroom wall tiles correctly determines the quality of the entire project. The batten method provides a level foundation regardless of floor conditions, and proper preparation, careful layout planning, and patience with the first row create professional results.
Sydney homeowners undertaking bathroom renovations face specific challenges: waterproofing compliance, variable building conditions, and high expectations for finished quality. Understanding where to start, and why it matters, puts most DIY tilers ahead of the common pitfalls.
We help Sydney homeowners and property investors complete bathroom renovations with confidence. Sydney Home Renovation combines practical tiling expertise with transparent project management, ensuring your renovation stays on budget and delivers lasting value. Contact us to discuss your bathroom project.
Frequently Asked Questions
Should I start tiling from the floor or the wall first?
Tile the walls first in most bathroom renovations. This approach allows floor tiles to tuck under wall tiles, creating a cleaner junction and better waterproofing. Wall tiles can also be cut more precisely to meet an already-tiled floor.
Do I tile behind the toilet and vanity?
Tiling behind fixtures is recommended but not always essential. Full tiling simplifies future renovations and provides complete waterproofing. At minimum, tile to the fixture outline plus 50mm to allow for repositioning during replacement.
How do I ensure my first row of tiles is level?
Use a spirit level and a temporary batten board fixed one tile height above the floor. The batten provides a straight, level reference independent of floor variations. Check level repeatedly during installation and adjust tiles before adhesive sets.
What is a batten board and why do I need one?
A batten board is a straight piece of timber screwed horizontally to the wall as a temporary support. It creates a level starting line for the first row of tiles. After the adhesive cures, the batten comes off, and the bottom row gets filled with cut tiles matching the floor profile.
Should I start tiling from the corner or the centre?
Start from the centre for feature walls and areas with focal points like windows or niches. This ensures balanced cuts at both edges. For standard walls, start from one end using the batten method, positioning cut tiles at the less visible edge.
How long should I wait before removing the batten?
Wait a minimum of 24 hours before removing the batten. Adhesive needs sufficient cure time to support tile weight without the temporary support. In cool or humid conditions, extend this to 48 hours.
Can I tile over existing bathroom tiles?
Tiling over existing tiles is possible if the original tiles are firmly bonded, level, and in good condition. Clean thoroughly, apply a bonding primer, and use flexible adhesive. Removal often produces better results since overlay adds thickness that can affect door clearances and fixture positions.


