
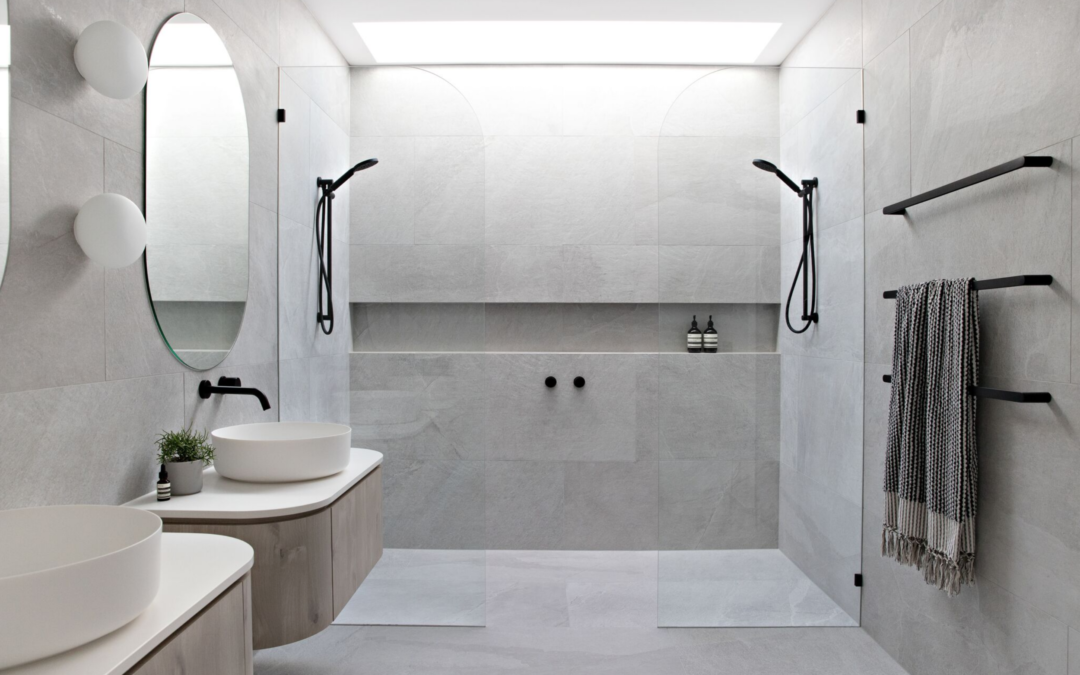
Proper tiling transforms a bathroom renovation from acceptable to exceptional. The difference between tiles that last decades and those that crack, lift, or leak within years comes down to seven fundamental rules that professional tilers follow on every project. Understanding these rules helps you budget accurately, communicate effectively with contractors, and recognise quality workmanship.
For Sydney homeowners planning a bathroom renovation, tiling typically represents 15-25% of your total project cost. Getting it right the first time prevents expensive remediation work. Getting it wrong can mean ripping everything out and starting again.
This guide covers each golden rule in detail, explains how they affect your renovation budget, and shows you what quality tiling looks like in practice.
What Are the Golden Rules of Tiling?
The golden rules of tiling are the foundational principles that ensure tiles are installed correctly, remain securely bonded, and perform well in wet environments over time. These rules cover everything from surface preparation through to final sealing and maintenance.
Professional tilers in Australia follow these standards because bathroom environments are demanding. Constant moisture exposure, temperature fluctuations, and daily use create conditions that expose any shortcuts or poor practices. The rules exist to prevent failures.
Why Following Tiling Rules Matters for Your Bathroom Renovation
Every tiling rule addresses a specific failure point. Skip substrate preparation, and tiles debond. Ignore waterproofing standards, and water penetrates the structure. Rush the layout, and you end up with awkward cuts that look unprofessional.
For renovators and property investors, understanding these rules helps you evaluate quotes accurately. A quote that seems expensive might include proper preparation work. A cheap quote might skip essential steps that cost more to fix later.
Quality tiling also affects property value. Buyers and valuers recognise professional finishes. Poorly laid tiles signal broader concerns about renovation quality throughout the property.
The Cost of Ignoring Proper Tiling Practices
Tiling failures are among the most expensive renovation problems to fix. Unlike a paint touch-up or a replaced fitting, failed tiles often require complete demolition and reinstallation.
Water damage from inadequate waterproofing can cost $10,000 to $50,000 to remediate, depending on how far moisture has spread. Structural timber damage, mould remediation, and replacement of adjoining finishes all add up quickly.
Even cosmetic failures create problems. Cracked grout, lippage between tiles, and inconsistent spacing make bathrooms look dated and poorly maintained. For investment properties, this affects rental appeal and resale value.
Rule 1 – Start with a Solid, Level Substrate
Tiles are only as good as the surface beneath them. A solid, level substrate ensures tiles bond properly, sit flat, and remain stable under use. This rule is non-negotiable for lasting results.
The substrate must be structurally sound, dimensionally stable, clean, and level within acceptable tolerances. For bathroom floors, this typically means no more than 3mm variation over 2 metres. Walls have similar requirements.
In Sydney bathroom renovations, substrate preparation often involves removing old tiles, repairing or replacing damaged cement sheets, and applying levelling compounds where needed. This preparation work is invisible once tiles are installed but determines long-term performance.
Preparing Cement Sheets and Wet Area Substrates
Australian wet area construction typically uses fibre cement sheets or tile backer boards as the substrate. These materials are moisture-resistant and provide a stable base for tile adhesive.
Before tiling, substrates must be:
- Clean – free from dust, grease, paint, or residue
- Dry – cured and at appropriate moisture content
- Primed – with appropriate primer for the adhesive system
- Level – within specified tolerances for the tile size
Large format tiles (over 300mm) require flatter substrates than smaller tiles. The larger the tile, the more visible any substrate imperfections become.
For floors, cement sheet joints must be taped and filled. Movement joints must align with substrate joints. These details prevent cracks telegraphing through to the finished surface.
How Substrate Preparation Affects Your Budget
Substrate preparation is where many budget blowouts originate. Contractors cannot accurately quote this work until they see what lies beneath existing finishes.
Expect preparation to add $50 to $150 per square metre depending on conditions. Severely damaged substrates requiring replacement cost more than surfaces needing only levelling compound.
Quality contractors include contingency allowances for substrate work. If your quote shows no allowance for preparation, ask how unexpected conditions will be handled. A fixed-price quote with no contingency often leads to disputes or compromised work.
Rule 2 – Waterproof Before You Tile
Waterproofing is the most critical step in bathroom tiling. Tiles and grout are not waterproof. They allow moisture to pass through. The waterproof membrane beneath the tiles is what actually keeps water out of your building structure.
In Australia, bathroom waterproofing must comply with AS 3740:2021 (Waterproofing of domestic wet areas). This standard specifies where waterproofing is required, minimum membrane heights, and acceptable products and methods.
All shower floors, shower walls to at least 1800mm height, and bathroom floors must be waterproofed. The membrane must extend under door thresholds and turn up at all wall junctions.
Australian Standards for Bathroom Waterproofing
The Australian Standard requires waterproofing to be applied by a licensed waterproofer in most states. In NSW, waterproofing is classified as specialist work requiring specific licensing.
Key requirements include:
- Minimum two coats of liquid membrane, applied in opposing directions
- Reinforcing tape at all internal corners and joints
- Bond breaker tape at external corners and movement joints
- Puddle flanges correctly installed at all floor wastes
- Minimum 24-hour cure time before tiling commences
Waterproofing must be inspected and certified before tiles are installed. This certificate is essential documentation for insurance, resale, and any future warranty claims.
Common Waterproofing Mistakes That Lead to Costly Repairs
The most common waterproofing failures occur at junctions and penetrations. Where walls meet floors, where pipes penetrate membranes, and where floor wastes connect are all high-risk areas.
Rushing the cure time is another frequent mistake. Membrane that hasn’t fully cured can be damaged during tiling, creating weak points that fail over time.
Inadequate membrane thickness causes failures. Liquid membranes must achieve minimum dry film thickness across the entire surface. Thin spots, especially on textured substrates, allow water through.
For Sydney renovators, always request the waterproofing certificate and keep it with your property documents. If problems emerge years later, this certificate is essential for warranty claims and insurance.
Rule 3 – Plan Your Tile Layout Before Installation
Professional tilers plan every tile position before mixing adhesive. This planning ensures the finished result looks intentional, balanced, and professionally executed.
Layout planning determines where tiles start, where cuts fall, and how patterns align with room features. Poor planning results in thin slivers of tile at edges, misaligned patterns, and awkward cuts around fixtures.
The goal is to maximise full tiles in visible areas and position cuts where they’re least noticeable. This requires measuring the space, calculating tile positions, and often dry-laying tiles to confirm the plan works.
Centring Tiles and Avoiding Thin Cuts
The general rule is to centre the tile layout so cuts at opposite edges are equal and greater than half a tile width. Cuts smaller than half a tile look like mistakes and are difficult to install cleanly.
For example, in a 2400mm wide shower, using 600mm tiles:
- Four full tiles = 2400mm (perfect fit, no cuts needed)
- Starting from centre means 300mm cuts at each edge if the wall is 2700mm
Tilers calculate these dimensions for every wall and floor, adjusting starting points to optimise the layout. Sometimes shifting the start point by 50mm eliminates an awkward cut entirely.
Feature walls with decorative patterns require even more careful planning. Pattern elements should centre on focal points and align with fixtures where possible.
Working Around Fixtures, Niches, and Drainage Points
Bathrooms contain numerous penetrations and features that interrupt tile layouts. Shower niches, tap penetrations, towel rails, toilet pans, and floor wastes all require cuts.
Quality tiling positions these elements to align with grout lines where possible. A shower niche that aligns with the tile grid looks intentional. One that falls randomly across tiles looks like an afterthought.
Floor wastes should ideally centre on a tile or align with grout lines. The fall to waste must be consistent, typically 1:80 gradient (12.5mm fall per metre) for shower floors.
Discuss fixture positions with your tiler before finalising layouts. Small adjustments to niche dimensions or tap positions can significantly improve the finished appearance.
Rule 4 – Choose the Right Adhesive and Grout
Tile adhesive and grout are engineered products designed for specific applications. Using the wrong product leads to failures that may not appear for months or years.
Adhesive must match the tile type, substrate, and location. Grout must suit the joint width, traffic level, and moisture exposure. Both must be compatible with each other and with any waterproofing membrane.
In wet areas, only adhesives and grouts rated for wet area use should be specified. Check that products comply with relevant Australian Standards and are suitable for the specific application.
Matching Adhesive to Tile Type and Location
Different tiles require different adhesives:
Ceramic tiles – standard cement-based adhesive suitable for most applications
Porcelain tiles – require premium adhesive with higher bond strength due to low porosity
Natural stone – often requires white adhesive to prevent discolouration, plus specific products for moisture-sensitive stones like marble
Large format tiles – require adhesive with extended open time and non-slump properties
Glass tiles and mosaics – require white adhesive and often specific products to prevent show-through
Wall applications require non-slump adhesive that holds tiles in position while curing. Floor applications can use standard or rapid-set products depending on project timing.
For heated floors, adhesive must be flexible enough to accommodate thermal movement. Standard rigid adhesives crack under repeated heating cycles.
Grout Selection for Wet Areas and High-Traffic Zones
Grout selection affects both appearance and maintenance:
Cement-based grout – traditional option, available sanded (for joints over 3mm) and unsanded (for narrow joints). Requires sealing in wet areas. More prone to staining and mould.
Epoxy grout – highly water-resistant, stain-proof, and mould-resistant. More expensive and harder to work with. Excellent for showers and splashbacks.
Hybrid polymer grout – combines cement-based workability with improved water resistance. Good middle-ground option for wet areas.
Grout colour affects maintenance visibility. Light grout shows staining more readily. Dark grout hides dirt but can fade over time. Medium tones often provide the best balance.
For shower floors, epoxy grout is increasingly specified despite higher cost. The long-term maintenance savings and hygiene benefits justify the investment.
Rule 5 – Maintain Consistent Grout Lines and Spacing
Consistent grout lines are a hallmark of professional tiling. Uneven spacing is immediately visible and makes even expensive tiles look poorly installed.
Grout line width affects both aesthetics and practicality. Wider joints accommodate tile size variations and substrate movement. Narrower joints create a more seamless appearance but require more precise tile sizing.
Australian standards recommend minimum 2mm joints for rectified (precision-cut) tiles and 3mm minimum for standard tiles. Larger tiles often look better with wider joints that provide visual proportion.
Using Tile Spacers and Levelling Systems
Tile spacers maintain consistent joint width throughout the installation. These simple plastic crosses or wedges sit between tiles during installation and are removed before grouting.
Levelling systems go further by eliminating lippage (height differences between adjacent tiles). These systems use clips and wedges to pull tiles flat against each other while adhesive cures.
For large format tiles, levelling systems are essential. Even small height differences between 600mm tiles create visible shadows and trip hazards. The cost of levelling systems is minimal compared to the quality improvement.
Professional tilers use these tools consistently. If your tiler doesn’t use spacers and levelling clips on large tiles, question their methods.
How Grout Line Width Affects Aesthetics and Maintenance
Grout line width creates different visual effects:
Narrow joints (2-3mm) – create a seamless, contemporary look. Require rectified tiles with precise dimensions. Show less grout, reducing maintenance visibility.
Standard joints (3-5mm) – suit most applications. Accommodate slight tile variations. Provide good balance of appearance and practicality.
Wide joints (5mm+) – suit rustic or handmade tiles with dimensional variation. Create a traditional appearance. More grout surface to maintain.
Maintenance increases with grout surface area. More grout means more cleaning and more potential for staining or mould. Consider this when selecting tile size and joint width for shower areas.
Rule 6 – Allow for Expansion and Movement Joints
Buildings move. Temperature changes, moisture variations, and structural settling all cause materials to expand, contract, and shift. Tiles are rigid and will crack if this movement isn’t accommodated.
Movement joints are gaps filled with flexible sealant (silicone) instead of rigid grout. They allow adjacent surfaces to move independently without transferring stress to tiles.
Australian Standard AS 3958.1 specifies where movement joints are required. Ignoring these requirements is a common cause of cracked tiles and failed grout.
Where to Place Silicone and Expansion Joints
Movement joints are required:
- At all internal corners – where walls meet walls, walls meet floors, walls meet ceilings
- At all external corners – where tiled surfaces wrap around corners
- Around all penetrations – pipes, fixtures, fittings
- At junctions with other materials – where tiles meet timber, metal, or different finishes
- At maximum 4.5m intervals – in large tiled areas
- Over structural joints – where building movement joints exist in the substrate
In bathrooms, this means silicone at every corner, around the shower base perimeter, around vanity splashbacks, and where tiles meet shower screens or bath edges.
Quality silicone rated for wet areas should be used. Cheap silicone discolours, shrinks, and fails prematurely. Specify sanitary-grade silicone with mould resistance.
Preventing Cracked Tiles and Grout Failure
Cracked grout at corners is almost always caused by missing movement joints. Rigid grout cannot flex, so it cracks when surfaces move relative to each other.
Cracked tiles in the field (not at edges) often indicate substrate movement or inadequate adhesive coverage. However, missing perimeter movement joints can also cause field cracking by preventing normal expansion.
For Sydney homes, seasonal temperature variation causes measurable tile expansion. Summer heat expands tiles; winter cold contracts them. Without movement joints, this cycling stress accumulates until something fails.
If you see cracked grout at corners in an existing bathroom, it indicates missing movement joints. Repairs require removing the grout and replacing with silicone – a relatively simple fix that prevents further damage.
Rule 7 – Seal and Protect Your Finished Tilework
Sealing protects porous materials from staining and moisture penetration. Not all tiles require sealing, but grout and natural stone typically do.
Sealing is the final step before handover. It should be done after grout has fully cured (typically 72 hours minimum) and before the bathroom is used.
The type of sealer depends on the material being protected. Grout sealers, stone sealers, and surface sealers all serve different purposes and suit different materials.
When to Seal Grout and Natural Stone Tiles
Cement-based grout – should be sealed in wet areas. Penetrating sealers soak into the grout and repel water and stains. Reapply annually or as specified by the product.
Epoxy grout – does not require sealing. It’s inherently water and stain resistant.
Porcelain and ceramic tiles – generally do not require sealing. The fired surface is non-porous.
Natural stone tiles – requirements vary by stone type:
- Marble and limestone – require sealing, sensitive to acids
- Granite – usually requires sealing, though some dense granites don’t
- Slate – typically requires sealing to enhance colour and protect surface
- Travertine – requires sealing, especially if unfilled
Unglazed tiles and terracotta also require sealing. Check manufacturer recommendations for specific products.
Long-Term Maintenance to Protect Your Investment
Proper maintenance extends the life of your tiling investment:
Regular cleaning – use pH-neutral cleaners designed for tiles. Avoid acidic cleaners on natural stone or cement grout. Avoid abrasive cleaners that scratch surfaces.
Ventilation – run exhaust fans during and after showering. Reducing moisture levels prevents mould growth and extends grout life.
Prompt repairs – fix cracked grout or failed silicone immediately. Small gaps allow water behind tiles, causing larger problems.
Periodic resealing – cement grout and natural stone require resealing every 1-3 years depending on use and product. Test by dropping water on the surface – if it soaks in rather than beading, resealing is due.
Avoid harsh chemicals – bleach, ammonia, and acidic cleaners damage grout and some stone. Use products specifically formulated for your tile and grout type.
How Tiling Quality Impacts Your Bathroom Renovation Budget
Tiling costs vary significantly based on tile selection, installation complexity, and workmanship quality. Understanding these variables helps you budget accurately and evaluate quotes effectively.
In Sydney, bathroom tiling typically costs $80 to $180 per square metre for labour, depending on tile size, pattern complexity, and site conditions. Materials add $30 to $300+ per square metre depending on tile selection.
A standard bathroom of 8-12 square metres might cost $2,500 to $6,000 for tiling labour and materials at mid-range specifications. Premium tiles and complex patterns push this higher.
Labour Costs for Professional vs. DIY Tiling
Professional tiling labour in Sydney ranges from:
- $65-85/m² – basic ceramic tiles, straightforward layout
- $85-120/m² – porcelain tiles, standard complexity
- $120-180/m² – large format tiles, complex patterns, natural stone
- $150-250/m² – intricate mosaics, feature walls, premium finishes
These rates reflect the skill, tools, and time required for quality installation. Cheaper rates often indicate shortcuts that cost more to fix later.
DIY tiling saves labour costs but carries significant risks. Waterproofing must still be done by licensed professionals. Mistakes in layout, adhesive selection, or technique result in failures that require professional remediation.
For investment properties, DIY tiling can void insurance coverage for water damage. The savings rarely justify the risk.
Material Allowances and Hidden Tiling Expenses
Beyond tile and labour costs, budget for:
Waterproofing – $50-80/m² for membrane application by licensed waterproofer
Substrate preparation – $50-150/m² depending on condition
Adhesive and grout – $15-40/m² depending on products specified
Silicone and sealers – $100-300 per bathroom
Tile wastage – allow 10-15% extra for cuts, breakage, and future repairs
Removal of existing tiles – $30-60/m² including disposal
Contingency – 10-15% of tiling budget for unexpected conditions
Hidden costs often emerge when existing tiles are removed. Water damage, inadequate previous waterproofing, and substrate deterioration are common discoveries that add to project costs.
Quality contractors identify these risks during quoting and include appropriate allowances. Suspiciously low quotes often exclude preparation work or assume best-case conditions.
Conclusion
The golden rules of tiling exist because bathroom environments are unforgiving. Moisture, movement, and daily use expose any shortcuts or poor practices. Following these rules ensures your tiles remain beautiful and functional for decades rather than failing within years.
For Sydney homeowners and property investors, understanding these principles helps you budget accurately, evaluate contractor quotes, and recognise quality workmanship. The difference between adequate and excellent tiling is often invisible during installation but becomes obvious over time.
At Sydney Home Renovation, we follow these golden rules on every bathroom project. Our transparent quoting includes proper preparation, compliant waterproofing, and quality materials. Contact us to discuss your bathroom renovation and receive a detailed quote that covers every aspect of professional tiling.
Frequently Asked Questions
What is the most important rule when tiling a bathroom?
Waterproofing is the most critical rule. Tiles and grout are not waterproof, so the membrane beneath them protects your building structure. Failed waterproofing causes damage costing tens of thousands of dollars to repair. Always ensure waterproofing is done by a licensed professional and certified before tiling begins.
How much does professional tiling cost in Sydney?
Professional tiling labour in Sydney costs $80 to $180 per square metre depending on tile type and complexity. A standard bathroom costs approximately $2,500 to $6,000 for tiling labour and mid-range materials. Large format tiles, natural stone, and complex patterns cost more than basic ceramic installations.
Can I tile over existing tiles in my bathroom?
Tiling over existing tiles is possible if the existing tiles are firmly bonded, level, and in good condition. However, it adds height that affects door clearances and fixture connections. Waterproofing compliance becomes complicated. Most quality renovations remove existing tiles to ensure proper substrate preparation and waterproofing.
How long should I wait before grouting after laying tiles?
Wait at least 24 hours before grouting to allow tile adhesive to cure. In cooler conditions or with thick-bed installations, wait 48 hours. Grouting too early disturbs tile positions and prevents proper adhesive cure. Check adhesive manufacturer recommendations for specific cure times.
What happens if waterproofing fails under bathroom tiles?
Failed waterproofing allows water to penetrate the building structure, causing timber rot, mould growth, and damage to adjacent rooms. Remediation requires removing all tiles, repairing structural damage, and reinstalling waterproofing and tiles. Costs typically range from $10,000 to $50,000 depending on damage extent.
Should I use large or small tiles in a small bathroom?
Large format tiles often make small bathrooms appear more spacious by reducing grout lines and visual clutter. However, they require more cuts and produce more waste in compact spaces. Medium tiles (300-450mm) often provide the best balance of appearance and practicality for small Sydney bathrooms.
How do I know if my tiler has done a quality job?
Quality tiling shows consistent grout lines, no lippage between tiles, balanced layouts with no thin cuts at edges, and silicone at all corners and junctions. Tiles should be firmly bonded with no hollow sounds when tapped. Request the waterproofing certificate and check that all work complies with Australian Standards.