
A bathroom that looks like it cost $30,000 can often be achieved for under $10,000 when you know where to focus your money. The secret isn’t spending more. It’s spending smarter on the details that create perceived luxury.
Sydney homeowners, first-time renovators, and property investors frequently assume an expensive-looking bathroom requires a complete gut renovation. That’s rarely true. Strategic upgrades to fixtures, finishes, and styling can transform a dated space without relocating plumbing or replacing structural elements.
This guide breaks down exactly where to invest, what materials deliver the best visual return, which tasks you can tackle yourself, and the common mistakes that make budget bathrooms look cheap. You’ll walk away with a clear action plan to elevate your bathroom’s appearance while protecting your renovation budget.
Why Budget Bathrooms Can Still Look Luxurious
The gap between an expensive-looking bathroom and an actually expensive bathroom is smaller than most people realise. Luxury is largely about perception, and perception can be engineered through deliberate design choices.
The Psychology of Perceived Value in Bathroom Design
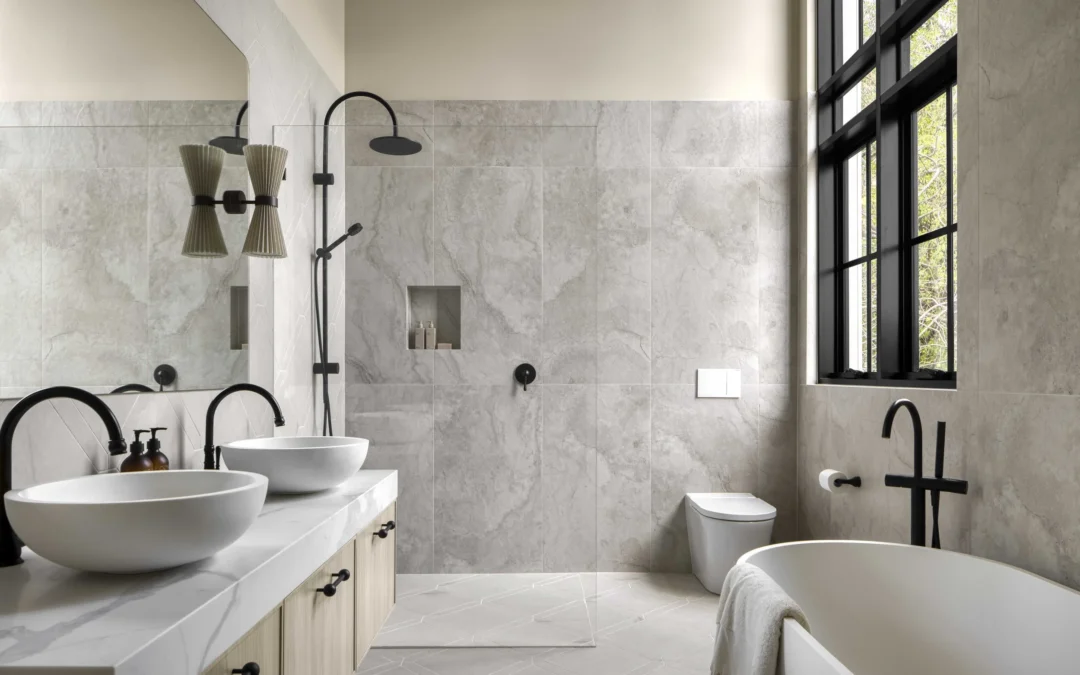
Humans assess quality through visual cues. Clean lines, consistent finishes, adequate lighting, and uncluttered surfaces signal “high-end” to our brains. A bathroom with mismatched chrome and brass fixtures reads as cheap regardless of what you spent. A bathroom with coordinated matte black tapware and a frameless mirror reads as designer, even if every item came from Bunnings.
Research into consumer perception confirms that consistency and cohesion matter more than individual item cost. When finishes match and design elements feel intentional, the overall space appears more valuable.
High-Impact vs. High-Cost: Understanding the Difference
Not all bathroom upgrades deliver equal visual returns. Relocating plumbing costs thousands but often goes unnoticed. Swapping dated tapware for modern fixtures costs a few hundred dollars and immediately catches the eye.
High-impact upgrades include:
- Tapware and hardware replacements
- Lighting improvements
- Mirror upgrades
- Grout cleaning or recolouring
- Fresh paint and caulking
High-cost, low-visual-impact changes include:
- Moving toilet or vanity locations
- Upgrading hidden plumbing
- Structural modifications
Understanding this distinction helps you allocate budget where it creates the most noticeable transformation.
Strategic Planning Before You Spend a Dollar
Rushing into purchases without a plan is the fastest way to blow your budget on items that don’t work together. Thirty minutes of assessment saves thousands in regret purchases.
Assess What You Already Have Worth Keeping
Walk through your bathroom with fresh eyes. Some elements that look tired simply need cleaning, regrouting, or minor repairs rather than replacement.
Worth keeping if in good condition:
- Bathtubs (can be refinished for $400-800 vs. $2,000+ replacement)
- Toilets less than 15 years old
- Vanity cabinets with solid construction
- Tiles without cracks or major damage
Usually worth replacing:
- Dated tapware and shower heads
- Yellowed or damaged mirrors
- Inefficient lighting
- Worn silicone and grout
Set a Realistic Budget Range for Sydney Renovations
Sydney renovation costs run higher than national averages due to labour rates and material transport. According to HiPages data, a cosmetic bathroom refresh in Sydney typically ranges from $5,000 to $15,000, while a full renovation averages $20,000 to $35,000 for a standard-sized bathroom.
For a budget-focused luxury look, target $3,000 to $8,000 for strategic upgrades without structural changes.
| Upgrade Category | Budget Range (Sydney) |
| Tapware replacement | $300-$1,200 |
| Lighting upgrade | $200-$800 |
| Mirror replacement | $150-$600 |
| Paint and caulking | $150-$400 |
| Accessories and styling | $200-$500 |
| Tile refresh (grout/paint) | $200-$600 |
Prioritise Upgrades That Deliver Maximum Visual Impact
Rank your upgrade wishlist by visibility and impact. The items people notice first should receive budget priority.
First priority (highest visibility):
- Tapware and shower fixtures
- Mirror
- Lighting
- Vanity top or basin
Second priority (supporting elements):
- Hardware (towel rails, hooks, toilet roll holder)
- Storage solutions
- Paint refresh
- Accessories
Third priority (if budget allows):
- Tile refresh or feature wall
- Shower screen upgrade
- Vanity replacement
Budget-Friendly Upgrades That Create an Expensive Look
These upgrades deliver the strongest visual transformation per dollar spent. Most can be completed in a weekend.
Update Tapware and Hardware for Instant Sophistication
Old chrome tapware with mineral buildup screams “dated.” Modern tapware in matte black, brushed nickel, or brushed brass instantly elevates the space.
Budget-friendly options:
- Bunnings and Reece stock quality mixer taps from $150-$400
- Complete tapware sets (basin, shower, bath) run $400-$900 for mid-range quality
- Matching towel rails and accessories add $100-$300
Installation tip: If your existing plumbing connections match standard Australian sizes, tapware swaps are straightforward DIY projects. Non-standard connections require a licensed plumber.
Upgrade Lighting to Transform the Entire Space
Poor lighting makes even expensive bathrooms look dull. Good lighting makes budget bathrooms glow.
Key lighting principles:
- Layer ambient, task, and accent lighting
- Install LED strips under floating vanities
- Use warm white (3000K) for flattering skin tones
- Position task lighting at face height beside mirrors, not above
A single pendant light or wall sconces beside the mirror can replace a basic ceiling fixture for $100-$300 plus installation.
Install a Frameless Shower Screen or Glass Panel
Framed shower screens with aluminium trim look dated. Frameless or semi-frameless glass panels create an open, spa-like feel.
Cost comparison:
- Basic framed screen: $300-$600
- Semi-frameless screen: $500-$900
- Fully frameless panel: $800-$1,500
The investment in frameless glass delivers significant perceived value increase, particularly for resale. Real estate research consistently identifies updated bathrooms as top value-adding renovations.
Add a Statement Mirror or Vanity Upgrade
Mirrors are the jewellery of bathrooms. A builder-grade mirror glued to the wall signals “basic.” A framed mirror, round mirror, or backlit LED mirror signals “designed.”
Budget options:
- Large round mirrors: $150-$400
- Framed rectangular mirrors: $100-$300
- LED backlit mirrors: $200-$600
If your vanity cabinet is structurally sound, consider replacing only the benchtop and basin. A new stone-look laminate top with an above-counter basin costs $400-$800 versus $1,500-$3,000 for a full vanity replacement.
Introduce Floating Shelves and Smart Storage Solutions
Clutter destroys the luxury illusion. Floating shelves, recessed niches, and concealed storage keep surfaces clear.
Budget storage solutions:
- Floating timber shelves: $50-$150
- Over-toilet cabinets: $100-$300
- Shower niches (if tiling): $150-$400 installed
- Drawer organisers: $20-$80
Affordable Material Choices That Look High-End
Material selection separates budget bathrooms that look cheap from budget bathrooms that look considered. The right choices mimic luxury without the price tag.
Large-Format Tiles for a Seamless, Luxurious Finish
Fewer grout lines create a cleaner, more expansive appearance. Large-format tiles (600x600mm or larger) achieve this effect at similar per-square-metre costs to smaller tiles.
Budget tile options in Sydney:
- Beaumont Tiles and Tile Warehouse stock large-format porcelain from $35-$70/m²
- Matt finishes hide imperfections better than gloss
- Rectified edges allow minimal grout lines (2-3mm)
Pro tip: Extending floor tiles partially up the wall creates visual continuity and perceived space expansion.
Subway Tiles and Classic Patterns That Never Date
Subway tiles remain a designer favourite because they’re timeless, affordable, and forgiving of imperfect installation.
Cost-effective approaches:
- Standard white subway tiles: $20-$40/m²
- Herringbone or vertical stack patterns add interest without extra cost
- Coloured grout (charcoal, grey) elevates basic white tiles
Vinyl and Laminate Options That Mimic Natural Stone
Modern luxury vinyl tiles (LVT) and laminate panels convincingly replicate marble, terrazzo, and natural stone at a fraction of the cost.
Material comparison:
| Material | Cost per m² | Look | Durability |
| Natural marble | $150-$400 | Authentic | High maintenance |
| Porcelain marble-look | $50-$100 | Very convincing | Excellent |
| Luxury vinyl tile | $30-$60 | Good | Good |
| Laminate panels | $40-$80 | Good | Moderate |
For wet areas, ensure any vinyl or laminate product is rated for bathroom use with appropriate waterproofing underneath.
Budget Benchtop Materials That Rival Engineered Stone
Engineered stone benchtops cost $400-$800 per linear metre installed. Budget alternatives achieve similar aesthetics for less.
Alternatives:
- Laminate with stone-look finish: $150-$300/lm
- Solid surface (Corian-style): $300-$500/lm
- Polished concrete look: $250-$450/lm
The key is selecting a finish with subtle veining or texture rather than obvious patterns that read as fake.
Colour, Texture, and Finish Techniques for a Premium Feel
Colour and finish choices influence perceived value as much as material quality. Restraint and consistency are your allies.
Neutral Palettes and Monochromatic Schemes
Luxury bathrooms rarely feature bold colours. Neutral palettes—white, grey, greige, soft black—create calm, sophisticated spaces that photograph well and appeal to broad tastes.
Effective neutral combinations:
- White walls + grey floor tiles + matte black fixtures
- Warm white + timber accents + brushed brass
- Soft grey throughout + white fixtures + chrome accents
Limit your palette to three colours maximum, including fixtures and accessories.
Matte Black, Brushed Nickel, and On-Trend Finishes
Chrome dominated bathrooms for decades. Today’s luxury spaces feature matte black, brushed nickel, brushed brass, or gunmetal finishes.
Finish selection guide:
- Matte black: Bold, contemporary, hides water spots
- Brushed nickel: Warm, timeless, versatile
- Brushed brass: Luxurious, suits warm palettes
- Chrome: Classic, budget-friendly, shows spots
Critical rule: Choose ONE finish for all tapware, hardware, and accessories. Mixed metals can work but require careful coordination that’s easy to get wrong.
Layering Textures Without Overwhelming the Space
Texture adds visual interest without colour complexity. Combine smooth, rough, and soft elements.
Texture layering examples:
- Smooth porcelain tiles + textured feature wall + soft towels
- Matte painted walls + glossy subway tiles + timber shelving
- Polished basin + matte tapware + woven storage baskets
Limit textured elements to one or two features. Too many competing textures create visual chaos.
DIY Tasks vs. Professional Work: Where to Save and Spend
Knowing what you can safely tackle yourself versus what requires licensed tradespeople protects both your budget and your home.
Safe DIY Projects for Confident Homeowners
These tasks require basic skills and tools without licensing requirements:
DIY-friendly upgrades:
- Painting walls and ceilings
- Replacing mirrors
- Installing towel rails and accessories
- Swapping tapware (if connections match)
- Replacing toilet seats
- Installing floating shelves
- Regrouting tiles
- Replacing silicone caulking
- Adding LED strip lighting (low voltage)
Tools you’ll need:
- Adjustable wrench
- Screwdriver set
- Silicone gun and remover
- Spirit level
- Drill with appropriate bits
When to Hire a Licensed Tradesperson in Sydney
Australian regulations require licensed professionals for specific work. In NSW, this includes:
Must hire licensed plumber:
- Any work involving water supply connections
- Drainage modifications
- Hot water system work
- Gas fitting
Must hire licensed electrician:
- New electrical circuits
- Moving power points
- Hardwired lighting installation
- Exhaust fan installation
Should hire professional:
- Waterproofing (requires certification in NSW)
- Tiling (for quality results)
- Structural modifications
Attempting licensed work yourself voids insurance, creates compliance issues, and can result in fines up to $22,000 for unlicensed plumbing work in NSW according to NSW Fair Trading.
Hidden Costs to Factor Into Your Budget
Budget blowouts often come from overlooked expenses rather than scope creep.
Commonly forgotten costs:
- Waste removal and tip fees: $100-$300
- Waterproofing certification: $300-$600
- Building permits (if structural): $200-$500
- Temporary bathroom arrangements during renovation
- Delivery fees for materials: $50-$150
- Contingency for unexpected issues: 10-15% of budget
Add a 15% contingency buffer to your planned budget. Older Sydney homes frequently reveal surprises behind walls—asbestos, water damage, or non-compliant previous work.
Styling and Finishing Touches That Elevate the Space
The difference between a renovated bathroom and a magazine-worthy bathroom often comes down to styling. These finishing touches cost little but impact significantly.
Coordinated Accessories and Towel Displays
Matching accessories create intentional design rather than accumulated clutter.
Coordination checklist:
- Soap dispenser, toothbrush holder, and tray in matching material
- Towels in coordinating colours (white, grey, or accent colour)
- Toilet brush and bin in matching finish to hardware
Towel display tips:
- Roll towels for spa-like presentation
- Stack folded towels in odd numbers (3 or 5)
- Use open shelving to display quality towels
- Replace frayed or mismatched towels—they undermine every other upgrade
Budget for $100-$200 on quality towels and coordinated accessories.
Greenery, Artwork, and Decorative Elements
Plants and art transform functional spaces into designed rooms.
Bathroom-friendly plants:
- Pothos (low light, humidity-loving)
- Snake plant (tolerates neglect)
- Ferns (thrive in humidity)
- Artificial plants (zero maintenance, modern options look realistic)
Artwork considerations:
- Frame prints in humidity-resistant frames
- Position away from direct water exposure
- Choose calming imagery that complements colour scheme
A single statement plant or framed print costs $30-$100 and adds personality that expensive fixtures alone cannot provide.
Decluttering and Organisation for a Polished Look
No amount of renovation disguises clutter. Luxury bathrooms feature clear surfaces and hidden storage.
Decluttering actions:
- Remove products you don’t use weekly
- Transfer daily products to matching containers
- Store backstock outside the bathroom
- Limit countertop items to three maximum
Organisation solutions:
- Drawer dividers for vanity storage
- Shower caddies that match fixture finish
- Behind-door hooks for robes
- Under-sink organisers
Common Mistakes That Make Budget Bathrooms Look Cheap
Avoiding these errors is as important as making good choices. One wrong decision can undermine an otherwise successful refresh.
Mismatched Finishes and Inconsistent Styles
The most common budget bathroom mistake is mixing finishes without intention. Chrome tapware with brass towel rails and black light fixtures creates visual confusion.
How to avoid:
- Photograph all existing fixtures before purchasing new items
- Bring samples or photos when shopping
- Commit to one metal finish throughout
- Match warm with warm (brass, gold, copper) or cool with cool (chrome, nickel, black)
Poor Lighting Choices and Placement
Insufficient or poorly positioned lighting makes any bathroom look dingy.
Lighting mistakes to avoid:
- Single ceiling downlight as only light source
- Downlights directly above the mirror (creates shadows under eyes)
- Cool white bulbs (above 4000K) that create clinical atmosphere
- No task lighting at vanity level
Correct approach:
- Multiple light sources at different heights
- Task lighting beside mirror at face height
- Warm white (2700-3000K) for flattering light
- Dimmer switches for ambiance control
Cutting Corners on Waterproofing and Functionality
Skimping on waterproofing or drainage creates expensive problems that far exceed any initial savings.
Non-negotiable investments:
- Proper waterproofing membrane in wet areas
- Adequate ventilation (exhaust fan rated for bathroom size)
- Quality silicone in wet areas (not cheap hardware store options)
- Correct fall to floor drains
Water damage from failed waterproofing costs $5,000-$20,000 to remediate according to Insurance Council of Australia data. The $500-$1,000 for proper waterproofing is non-negotiable.
Conclusion
Creating an expensive-looking bathroom on a budget comes down to strategic choices rather than unlimited spending. Focus your investment on high-visibility upgrades like tapware, lighting, and mirrors. Choose materials that mimic luxury finishes without the premium price. Maintain consistency in colours, finishes, and styling throughout the space.
The principles outlined here apply whether you’re refreshing a bathroom for personal enjoyment or preparing a property for sale. Sydney’s competitive property market rewards well-presented bathrooms, and buyers rarely distinguish between genuinely expensive renovations and cleverly executed budget transformations.
Ready to transform your bathroom without blowing your budget? Sydney Home Renovation provides transparent cost planning and practical renovation expertise to help you achieve the look you want at a price that makes sense. Contact us for honest guidance on your bathroom renovation project.
Frequently Asked Questions
What is the cheapest way to update a bathroom in Sydney?
The cheapest impactful updates are replacing tapware, adding a new mirror, and refreshing paint and silicone. These changes cost $500-$1,500 combined and create noticeable improvement without structural work or licensed trades.
Can you make a small bathroom look expensive on a budget?
Yes. Small bathrooms benefit from large-format tiles that reduce grout lines, frameless shower screens that eliminate visual barriers, and consistent light colours that reflect light. These strategies create perceived space and luxury without premium costs.
What bathroom upgrades add the most value for resale?
Updated tapware, modern lighting, and frameless shower screens deliver the strongest return on investment for resale. CoreLogic research indicates bathroom renovations can return $2-$3 for every $1 spent when executed well.
Should I replace or refinish my existing bathtub?
Refinish if the bathtub is structurally sound with only surface damage. Professional bathtub refinishing costs $400-$800 versus $2,000-$5,000 for replacement including installation. Refinishing extends lifespan by 10-15 years.
How much should I budget for a cosmetic bathroom refresh?
A cosmetic refresh in Sydney—including tapware, mirror, lighting, paint, and accessories—typically costs $3,000-$8,000 without structural changes. Add $5,000-$10,000 if including new tiles or vanity replacement.
Are frameless shower screens worth the investment?
Frameless screens cost $300-$900 more than framed alternatives but significantly increase perceived bathroom value. They’re particularly worthwhile for resale properties or bathrooms where visual openness matters.
What finishes make a bathroom look more luxurious?
Matte black, brushed nickel, and brushed brass finishes currently read as most luxurious. Consistency matters more than specific finish choice—matching all fixtures and hardware in one finish creates cohesion that signals intentional design.